
Types of Chimney Flashing in Fort Worth Homes
You notice a brown ceiling mark after a hard North Texas storm. The stain sits near the chimney, so you climb into the attic, find damp decking, and assume a contractor can seal the visible metal with a bead of caulk. That assumption is responsible for many repeat leaks across Fort Worth and the surrounding DFW communities.
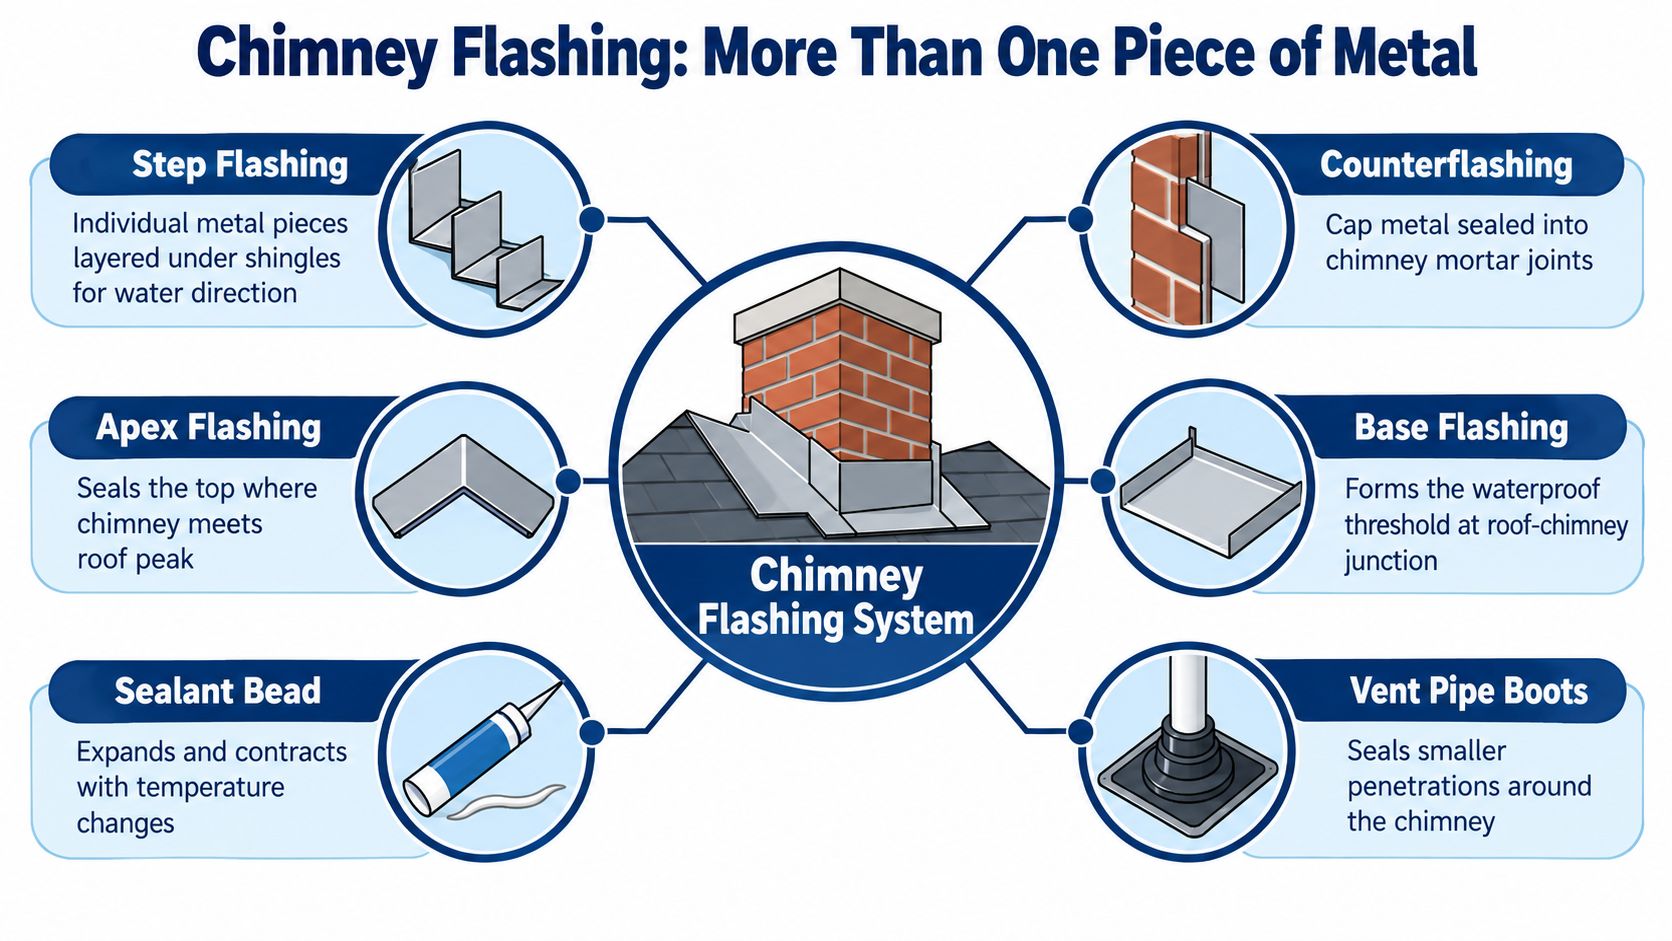
Chimney flashing isn't one strip of metal. It's a drainage assembly that combines roof-side flashing, chimney-side counterflashing, layered side details, masonry joints, fasteners, and, where the roof geometry calls for it, an uphill cricket. A proper inspection follows the water path instead of stopping at the first cracked sealant.
Table of Contents
- Why Chimney Flashing Is More Than a Single Strip of Metal
- The Four Principal Types of Chimney Flashing Explained
- Common Flashing Failure Points and How to Spot Them
- Choosing the Right Flashing Material for Your DFW Home
- When Your Chimney Needs a Cricket or Saddle Flashing
- Working with Local Roofing Experts in the DFW Metroplex
Why Chimney Flashing Is More Than a Single Strip of Metal
On an inspection in Fort Worth, a ceiling stain below a chimney can look like a failed front apron. The actual problem may be counterflashing that no longer engages the masonry, deteriorated mortar, step flashing buried incorrectly under replacement shingles, or runoff collecting on the uphill side. Water often travels before it becomes visible, so the interior stain doesn't reliably identify the failed component.
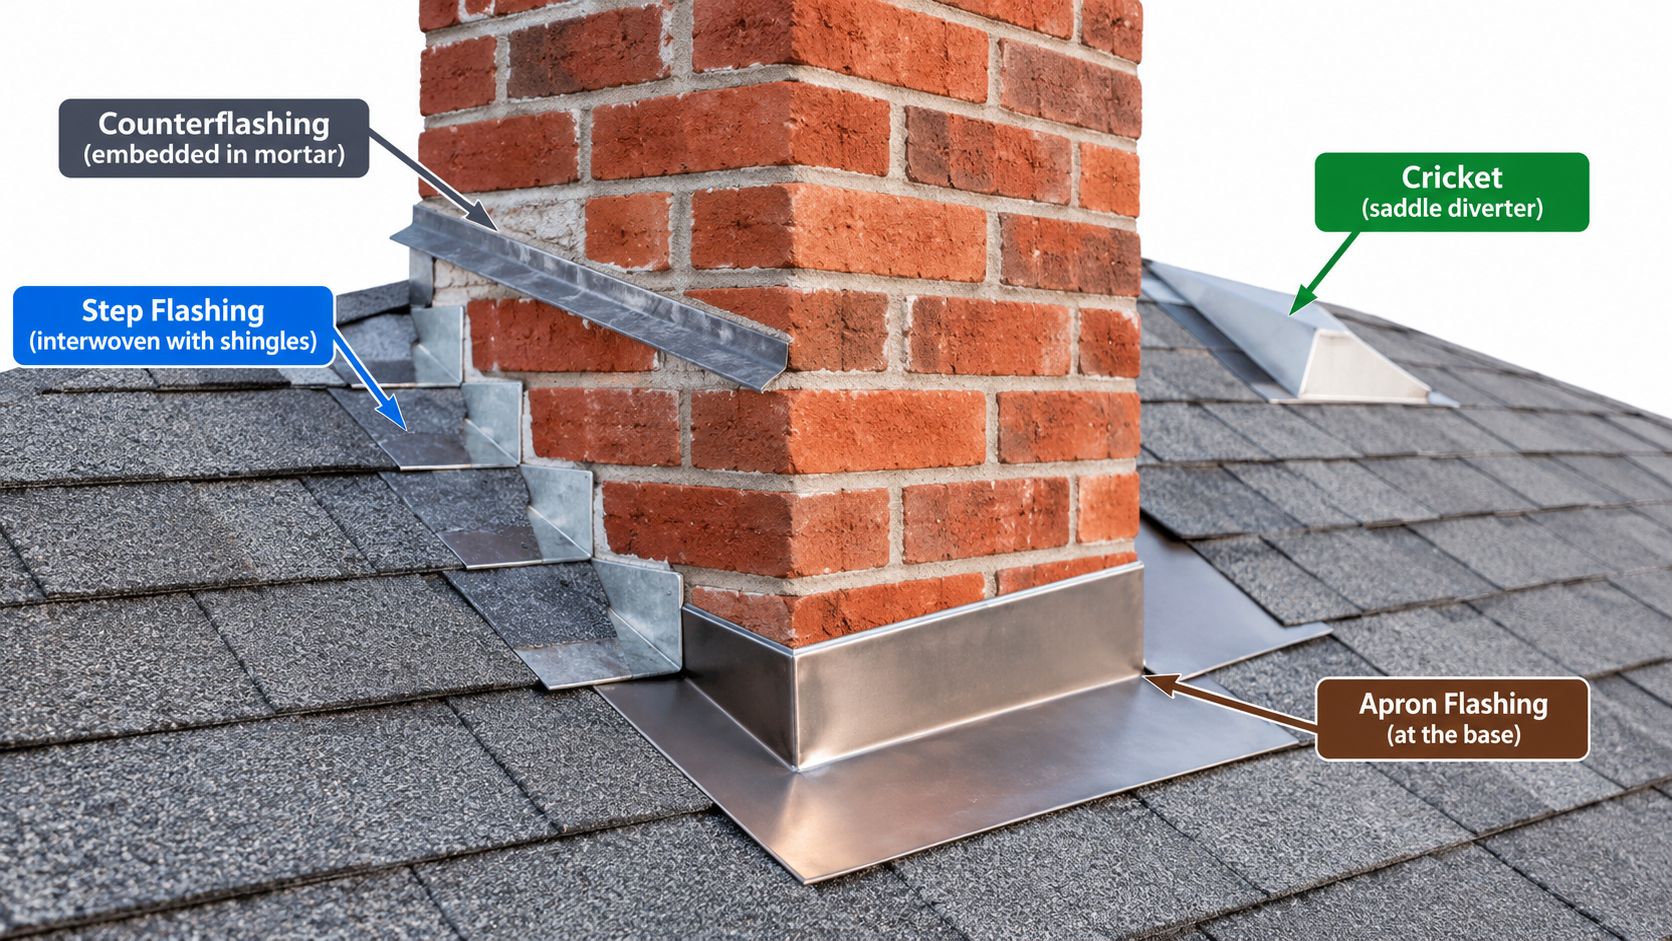
Historic-preservation guidance from the U.S. Forest Service identifies four principal flashing types for chimneys passing through shingle or shake roofs:
- Base or apron flashing at the lower side directs water downslope.
- Step flashing runs along both side walls and works course by course with the roof covering.
- Counterflashing or cap flashing covers the upper edge of the base and step pieces at the masonry.
- Saddle or cricket flashing sits on the uphill side and diverts concentrated runoff.
These parts divide the work. Base flashing sheds water, step flashing accommodates the layered roof covering, counterflashing protects the masonry joint and upper edges, and a cricket changes the drainage route where the chimney interrupts water moving down the roof.
The failure rarely stays in one place
A roofer who replaces only exposed caulk may make the chimney look finished without restoring the drainage assembly. Sealant has a supporting role. It shouldn't substitute for correctly lapped metal, sound mortar, compatible fasteners, and a clear path for runoff.
Practical rule: Trace water from the uphill roof plane to the eave. Don't diagnose a chimney leak by looking only at the stain or the most obvious crack.
For homes in Fort Worth, Arlington, Dallas, Plano, Irving, Denton, Richardson, and Grapevine, the inspection should account for the entire roof-to-chimney interface. The Dallas–Fort Worth–Arlington metropolitan area includes distinct cities and municipalities, and the North Central Texas Council of Governments regional overview provides a defensible geographic framework for that service area.
A complete evaluation checks the flashing material, fasteners, mortar joints, roof covering, underlayment interface, and uphill drainage. That approach takes longer than smearing sealant over a visible gap, but it addresses the failure mechanism instead of hiding it.
The Four Principal Types of Chimney Flashing Explained
Each component has a specific position and job. If one is missing, undersized, or installed in the wrong sequence, the rest of the assembly has to work harder.
Base or apron flashing
Base flashing sits where the chimney meets the roof and forms the lower water-shedding layer. At the front, the apron receives runoff from the chimney face and sends it onto the roof covering. On a shingle roof, the lower edge should integrate with the shingle courses rather than sit as a decorative strip on top.
Copper-development guidance calls for stepped base flashing to extend at least 4 inches up the chimney wall and onto the roof, while each piece rises 2 inches above its shingle course. Those dimensions create a meaningful overlap between the vertical surface and the roof drainage plane. A narrow strip tacked over old shingles may look tidy, but it doesn't provide the same layered protection.
Step flashing
Step flashing consists of individual L-shaped pieces installed along the two chimney side walls. Each piece works with one shingle course, so water moves from the upper piece onto the lower piece and then back onto the roof surface.
The published summary of the 2024 International Residential Code describes side pieces overlapping the piece below by at least 2 inches, with the vertical leg extending at least 4 inches up the chimney. A roofer should inspect the sequence, not just the exposed top edge. If replacement shingles were installed without rebuilding the side flashing, the roof may be new while the drainage detail remains old.
Counterflashing or cap flashing
Counterflashing covers the upper edge of the base and step flashing. It belongs on the chimney side and should engage the masonry through a properly formed joint or reglet, rather than relying on a surface bead of caulk.
The General Services Administration's chimney flashing guidance specifies counterflashing overlap of at least 4 inches and a minimum 2-inch return at each end of the rear cap-flashing piece. On clay-tile roofs, it advises extending chimney flashing at least 6 inches up vertical surfaces and thoroughly counterflashing it.
Cricket or saddle flashing
A cricket is a raised, sloped diversion on the uphill side of the chimney. It splits and redirects runoff toward the roof slopes instead of allowing water to collect against the rear wall.
Copper guidance calls for a copper cricket where the chimney sits entirely on one side of the roof ridge. The need also depends on chimney width and local code adoption, which is why a roofer should measure the chimney and confirm the applicable jurisdiction rather than apply a one-size-fits-all rule.
| Flashing Type | Location | Primary Function | Key Dimension |
|---|---|---|---|
| Base or apron | Lower chimney edge | Directs water downslope | At least 4 inches up the wall and onto the roof |
| Step flashing | Chimney side walls | Layers with shingles to shed water | At least 2-inch overlap, with a 4-inch vertical leg |
| Counterflashing | Upper edge at masonry | Covers and protects base and step flashing | At least 4-inch overlap |
| Cricket or saddle | Uphill side | Diverts concentrated runoff | Geometry and local code determine need |
Common Flashing Failure Points and How to Spot Them
The most misleading chimney leaks are the ones where the visible defect is real but not the primary cause. Cracked sealant may deserve replacement, yet the water may be entering through missing step flashing or a deteriorated mortar joint above it.
Read the symptom against the assembly
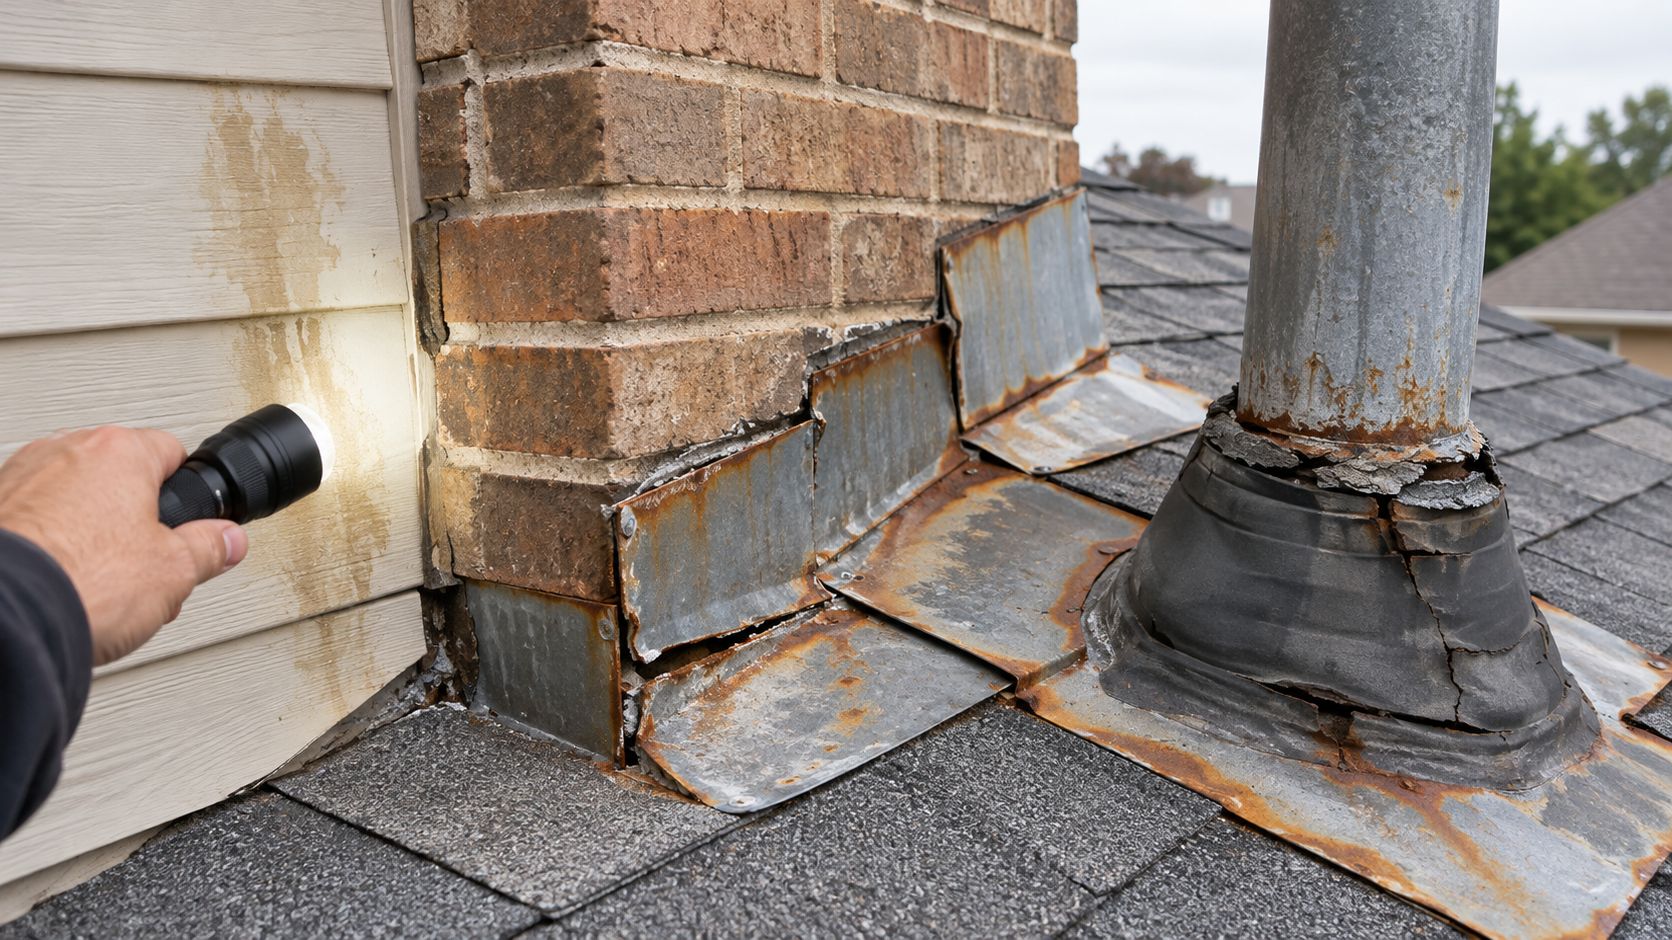
Step flashing problems often follow roof replacement. The shingles look new, but the installer may have left old side pieces in place, cut around them poorly, or failed to interweave each piece with the new course. Look for exposed edges, short vertical legs, missing overlaps, and fasteners placed where water can track through the metal.
Counterflashing failure appears as an open joint at the chimney. Temperature movement, masonry deterioration, and poor installation can pull the metal away from the mortar. If the counterflashing isn't covering the upper edge of the base and step pieces, a new sealant bead only masks the gap.
Base flashing damage can show up as rust, distortion, punctures, or an apron that terminates before it properly reaches the roof drainage plane. A storm can bend an exposed edge, but a bad original lap can leak even when the metal still looks clean.
What to verify before accepting a spot repair
- Measure the laps: Compare the installation with the objective benchmarks for wall height, shingle-course rise, step overlap, and counterflashing coverage.
- Inspect the mortar: Cracked or missing mortar can let water behind the counterflashing, even when the metal itself remains serviceable.
- Follow the uphill path: Check whether runoff meets a raised chimney wall without a suitable saddle or cricket.
- Check the fasteners: Exposed or incompatible fasteners can create entry points and corrosion.
- Separate roof damage from flashing damage: Hail, wind, lifted shingles, and damaged underlayment can mimic a chimney failure.
A caulk line is not proof of a watertight flashing system. It only proves that someone applied caulk.
The National Chimney Authority's flashing installation discussion highlights the diagnostic importance of chimney geometry, crickets, mortar joints, and masonry interlock. That matters in Arlington, Fort Worth, and nearby cities because a ceiling stain near the chimney can come from several independent paths.
A proper repair may involve removing roofing around the chimney, rebuilding step and base flashing, cutting or repairing the masonry joint, replacing incompatible fasteners, and restoring the roof covering in the correct sequence. If the metal is sound and the defect is limited to a failed joint, resealing may be appropriate. If the assembly is incomplete, surface sealant isn't a substitute for reconstruction.
Choosing the Right Flashing Material for Your DFW Home
Material selection should follow the complete assembly. The right question isn't whether copper, aluminum, or galvanized steel looks better. Ask whether the flashing, fasteners, masonry, roof covering, runoff, and adjacent metals can remain compatible through North Texas weather and future roof work.
Copper and lead-coated copper
Copper is formable and well suited to custom details, specialty roofs, and historic restoration. Copper-development guidance recommends 16-ounce copper for chimney apron and cap flashing, while GSA examples include 16- or 20-ounce sheet copper.
Copper works best when the whole assembly supports it. Use copper or otherwise compatible fasteners throughout, and prevent copper runoff from contacting galvanized sheet metal or stainless steel. Copper can cause galvanic corrosion when it meets incompatible metals, especially where rainwater carries runoff from one piece onto another.
Lead-coated copper offers a different appearance and can suit historic or specialty work where plain copper isn't appropriate. It still demands compatible detailing and careful separation from dissimilar metals.
Galvanized steel
Galvanized steel remains practical for many asphalt-shingle roofs when its protective coating is intact and the fasteners match the assembly. GSA guidance identifies 26-gauge galvanized steel as an example suitable for historic work, and a published code summary describes a minimum 26-gauge requirement for galvanized sheet metal under the cited model provision.
The weakness isn't that galvanized steel is automatically unsuitable. Problems arise when installers combine it with copper, use incompatible fasteners, cut through protective coatings, or allow water from a higher copper component to drain onto it.
Aluminum
Aluminum is light and workable, but it requires careful isolation from masonry and other metals. The Virginia Roof Authority flashing standards summary notes that aluminum may require separation from concrete or masonry and that copper can create galvanic-corrosion risks when paired improperly with aluminum.
The U.S. Forest Service specifically warns against combining aluminum with steel or copper, and against combining copper with steel, unless compatible separation or fasteners prevent direct contact. In a DFW roof replacement, that warning matters because a new flashing component may meet older metal at the same chimney.
| Material | Durability | Compatibility Risks | Best For | Relative Cost |
|---|---|---|---|---|
| Copper | Durable and highly formable | Runoff and contact can corrode adjacent metals | Specialty roofs, historic work, custom details | Higher |
| Lead-coated copper | Durable with a distinct finish | Requires compatible fasteners and adjacent materials | Historic and premium applications | Higher |
| Galvanized steel | Practical when coating remains intact | Copper contact, poor fasteners, damaged coating | Common asphalt-shingle assemblies | Moderate |
| Aluminum | Light and workable | Contact with masonry, steel, or copper | Selected assemblies with proper isolation | Moderate |
Match the material to the roof
For asphalt shingles, compatible galvanized steel can be practical, while copper becomes valuable when custom fabrication or architectural coordination calls for it. Slate, cedar shake, and clay tile often need carefully formed pieces that respect the thickness and movement of the roof covering. Standing-seam metal requires particular attention to movement and transitions, because fastening a flashing detail too rigidly can transfer stress into the roof system.
Premium metal isn't automatically a better repair. If the reglet, mortar, underlayment, or step-flashing interface is defective, expensive metal won't correct the drainage path. The repair should specify the material, thickness or weight, fasteners, separation method, laps, and masonry work together.
When Your Chimney Needs a Cricket or Saddle Flashing
The uphill side of a chimney is where roof geometry becomes decisive. Water moving down the roof meets a vertical obstruction, and the chimney can create a concentrated drainage zone. A cricket raises the center of that zone and directs water toward the roof slopes.
The model-code summary cited in current industry guidance calls for a cricket or saddle on the upslope side of chimneys wider than 30 inches, although jurisdictions can adopt or amend model-code provisions. That threshold is a starting point for evaluation, not permission to ignore the roof shape or local requirements.
What a cricket changes
Without adequate diversion, runoff can pond or force its way behind the rear flashing. A properly designed cricket has a sloped surface, compatible metal, secure transitions into the roof covering, and counterflashing that protects the chimney-side joint. Its width and shape should reflect the chimney and roof layout, not a generic prefabricated patch.
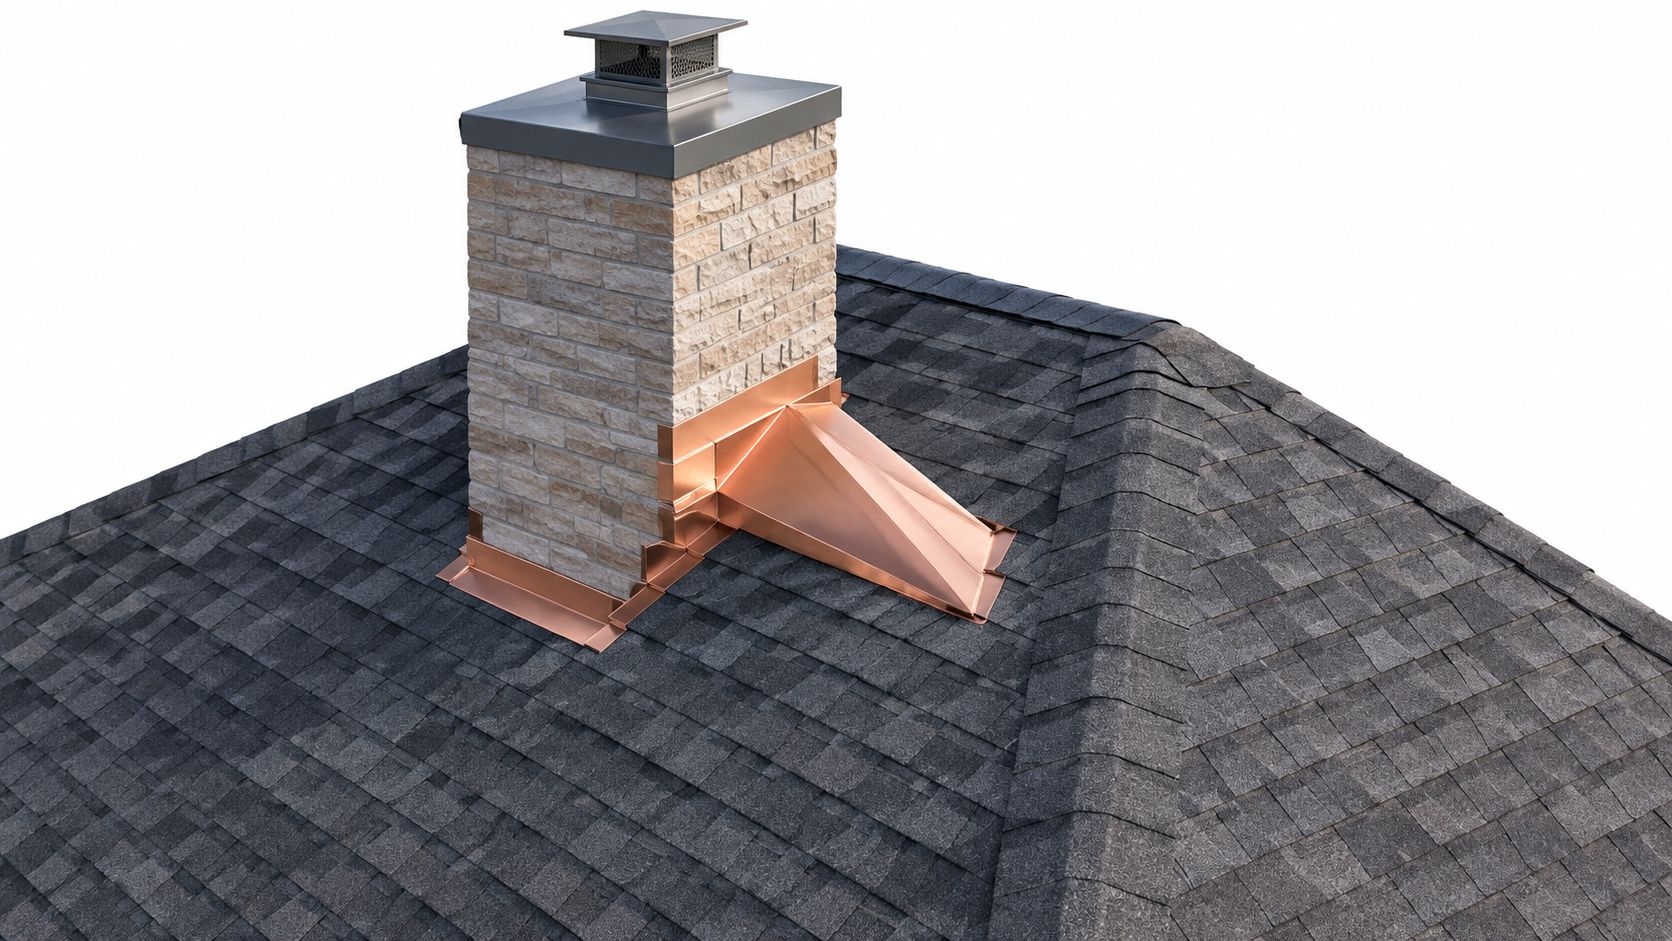
A chimney doesn't need a cricket merely because it's old, and a newer chimney isn't automatically protected without one. Measure the chimney across the relevant face, examine whether it sits entirely on one side of the ridge, and determine how much roof water reaches the uphill wall.
Diagnose before retrofitting
Water staining near the rear of a chimney may point to:
- Missing or undersized cricket: Runoff reaches the chimney faster than the rear detail can shed it.
- Failed counterflashing: The upper edge of the base or step flashing is exposed at the masonry.
- Deteriorated mortar: Water enters through the joint that should hold and protect the counterflashing.
- Roof-cover damage: Hail, wind, cracked tile, or displaced shingles provide an entry path away from the metal.
A retrofit cricket can solve the drainage problem, but only if the surrounding flashing, roof covering, and masonry are rebuilt into the new path. Installing a premium copper saddle over defective step flashing is still an incomplete repair.
Working with Local Roofing Experts in the DFW Metroplex
Chimney flashing repair should begin with an assembly-level inspection, especially after wind or hail affects homes in Fort Worth, Arlington, Plano, Irving, Denton, Richardson, Grapevine, and surrounding DFW communities. The contractor should document the metal, fasteners, mortar joints, roof covering, uphill drainage, and any storm impact before recommending sealant, partial replacement, or a complete rebuild.
Blue Lake Roofing & Remodeling provides roof repair, replacement, custom flashing and counterflashing fabrication, specialty roofing, and storm-damage inspection across Tarrant, Collin, Denton, and Dallas counties. Its custom metal work includes step, apron, and pan flashing, along with chimney caps and shrouds. For contractors building a stronger local service presence, this roofing local search playbook offers useful context on location-focused marketing.

Ask for photos, measured dimensions, material specifications, and a clear explanation of whether the repair includes masonry and roof-cover work. A contractor familiar with DFW codes and storm documentation can distinguish ordinary deterioration from wind or hail damage and can address the drainage assembly rather than applying a temporary patch.
Blue Lake Roofing & Remodeling offers on-site inspections, flashing repair and replacement, custom metal fabrication, specialty roofing, and storm-damage documentation for homes across the DFW area. Visit Blue Lake Roofing & Remodeling to request an inspection focused on the complete chimney flashing system, including the cricket, counterflashing, fasteners, mortar joints, and roof drainage path.
