

Roof Leak Repair in Fort Worth: A Homeowner's Guide
Rain is hitting the windows sideways, there's a bucket beneath the living-room ceiling, and you're trying to work out whether that brown ring was there yesterday. For a Fort Worth homeowner, the immediate question isn't which shingle to buy. It's how to stop the damage safely and find out where the water got in.
Good roof leak repair starts by separating the visible symptom from the roof defect. That distinction matters after a North Texas hailstorm, but it matters just as much when an aging pipe boot finally lets water through during an ordinary rain.
Table of Contents
- Why Fort Worth Homeowners See More Roof Leaks Than They Expect
- Tracing a Leak From the Ceiling Stain to the Real Entry Point
- Temporary Fixes You Can Safely Apply Before the Crew Arrives
- Comparing the Three Main Leak Sources on DFW Homes
- Permanent Repairs That Actually Stop the Water
- After the Storm - A North Texas Post-Storm Checklist
- When to Call a Fort Worth Roofer Instead of Fixing It Yourself
Why Fort Worth Homeowners See More Roof Leaks Than They Expect
During a spring storm in Fort Worth, a ceiling drip can make the shingles directly overhead look guilty. Yet the opening may be farther up the slope, where a plumbing vent meets the roof or a wall interrupts the drainage plane. Replacing the nearest damaged-looking shingle without investigating that connection is a guess, not a diagnosis.
North Texas storm inspections need to account for hail impact, wind damage, and wind-driven rain, while separating those conditions from ordinary deterioration. Summer heat and temperature changes also belong in the conversation, but a weathered roof isn't automatically a storm-damaged roof. The repair scope should follow the physical evidence, not whichever weather event happened most recently.
The stain isn't a roof map
Water can follow decking, rafters, insulation, and wall cavities before becoming visible indoors. That's why a ceiling stain identifies an affected area, not necessarily the entry point, as explained in this roof-leak tracing guide. A sound inspection distinguishes the opening from the route water took afterward.
Practical rule: Ask the roofer to show you the entry point and explain the route to the interior damage.
That question helps prevent a superficial patch. It also encourages documentation that separates a damaged component from unrelated aging elsewhere on the roof.
Why prompt action matters
Insurance figures illustrate the financial stakes without telling us how often roofs leak. For 2019–2023, approximately 1 in 60 insured homes annually had a water-damage or freezing claim averaging $15,400, while wind and hail claims occurred at roughly 1 in 35 homes and averaged $14,747, according to this discussion of Insurance Information Institute figures based on ISO data.
The water-damage category includes plumbing, appliances, and other sources, so it isn't a roof-leak frequency. The practical lesson is narrower: don't judge urgency by the size of the roof opening. A small exterior defect can leave insulation, drywall, framing, and belongings needing attention.
Tracing a Leak From the Ceiling Stain to the Real Entry Point
Start indoors, not on a ladder. Before anyone disturbs materials, photograph the stain, active dripping, nearby walls, and affected belongings. Include a wider room view so the roofer can orient the damage beneath the roof.
Record whether the leak appeared during driving rain, continued afterward, or occurred without rainfall. Those observations help an investigator decide where to look without assuming every wet ceiling has a roofing cause.
Follow evidence through the assembly
- Document moisture. A qualified investigator can take moisture-meter readings around the stain and compare them with apparently dry areas. Readings help establish boundaries, but they don't identify the entry point by themselves.
- Check accessible attic areas. Observe only from a stable, supported location with adequate lighting. Don't step onto insulation or ceiling drywall, disturb wiring, or enter an area with sagging materials.
- Identify the highest visible wet area. Look for staining beneath the roof deck, damp framing, and wet insulation. Photograph observations rather than pulling the assembly apart.
- Have the exterior inspected. The roofer should examine penetrations, pipe boots, chimney details, wall transitions, valleys, and edge metal before assuming the field shingles failed.
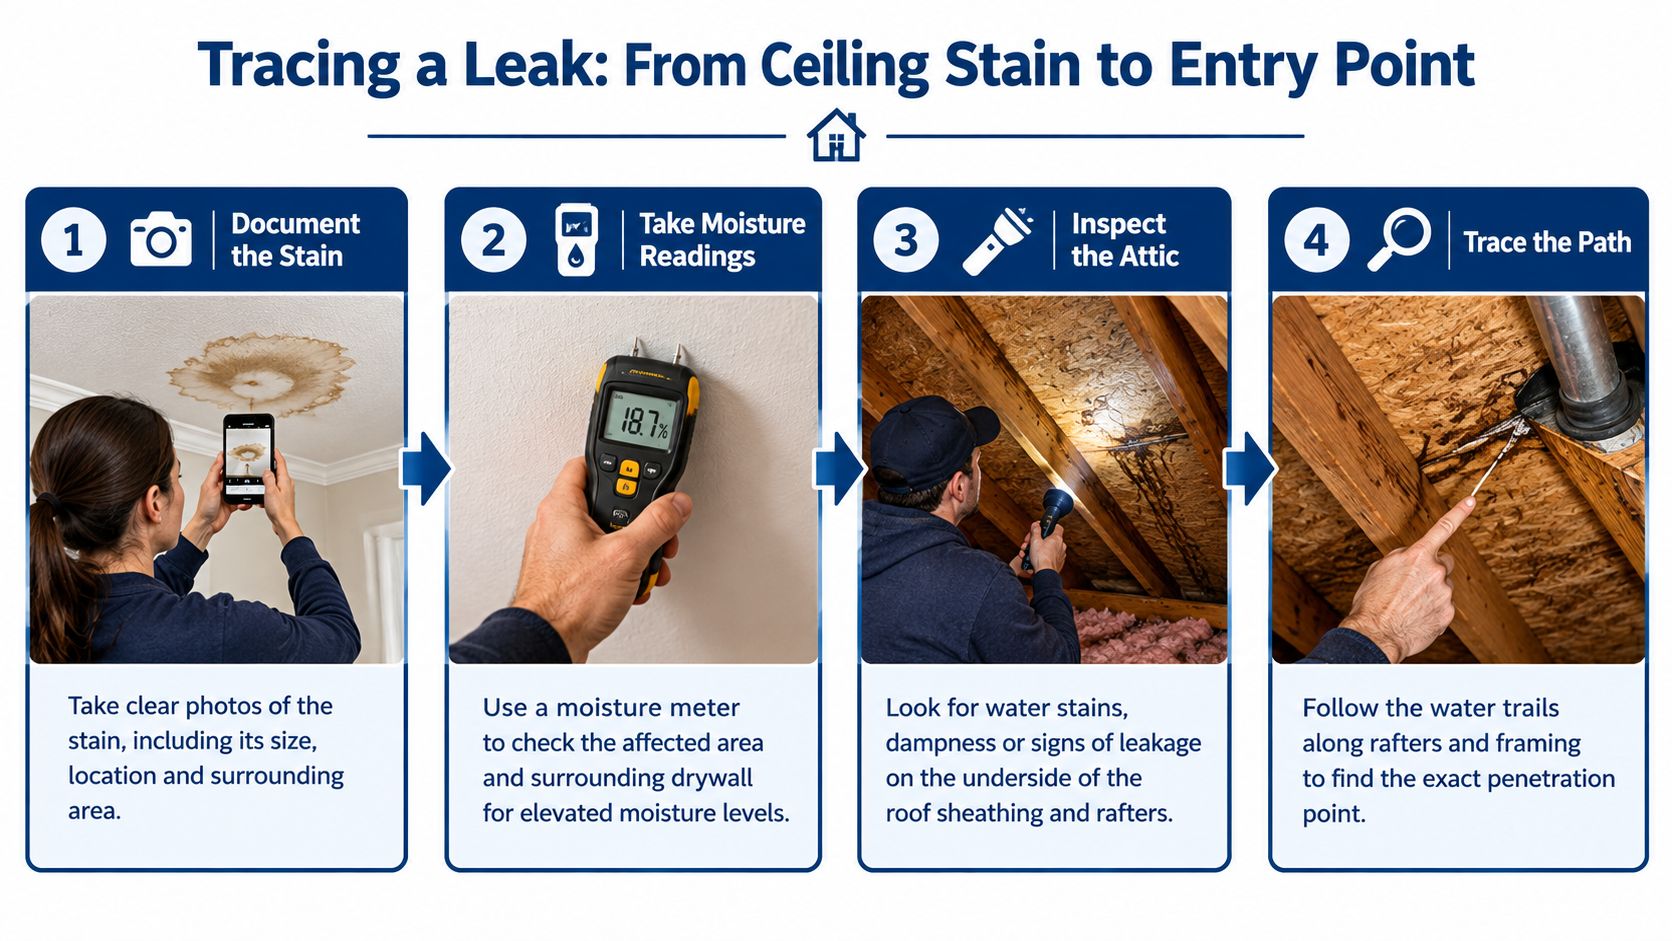
This evidence-first approach follows NRCA guidance on thorough leak investigation and repair validation. Junctions and penetrations deserve close attention, but don't assume a particular component failed before examining it.
When the source remains unclear
If visual inspection doesn't resolve the question, a professional may use a controlled hose test. The investigator starts at the lowest suspect area, wets small zones, and progresses uphill while another person watches inside. Flooding the whole slope at once makes the result harder to interpret and can introduce unnecessary water.
Don't attempt this from a wet or steep roof. Roof access, fall protection, and managing additional water belong with the crew.
If the evidence points toward plumbing or another concealed building-system leak, it can help to compare leak detection service providers using Axis Meter Solutions' resource. Ask prospective providers what systems they investigate and what documentation they deliver, rather than assuming every leak-detection service handles roofing.
Keep the photographs and investigator's findings together. A clear location record helps the repair crew work on the verified defect instead of starting over.
Temporary Fixes You Can Safely Apply Before the Crew Arrives
The safest temporary work usually happens inside the house. Move people, furniture, electronics, and valuables out of the affected area, then contain dripping where the ceiling remains stable and there's no electrical exposure.
If water is entering a light fixture, smoke alarm, outlet, or electrical equipment, stay clear. Have a qualified professional address the electrical hazard before anyone works nearby.
Containment comes before roof access
Use a bucket or suitable container beneath a stable drip and protect the surrounding floor without creating a slipping hazard. A dehumidifier can support drying once it's safe to use electrical equipment, but it doesn't establish whether concealed materials are dry.
Don't puncture a bulging ceiling yourself. The weight of trapped water, concealed wiring, and weakened drywall make that a professional assessment. Keep everyone out from beneath sagging or bulging areas.
A temporary measure should reduce exposure without creating a fall, electrical hazard, or uncontrolled ceiling failure.
What to leave for the crew
A properly arranged tarp can divert rainfall while a permanent repair is organized. Its placement and anchoring need to account for drainage, roof condition, wind exposure, and damage the fasteners themselves could cause.
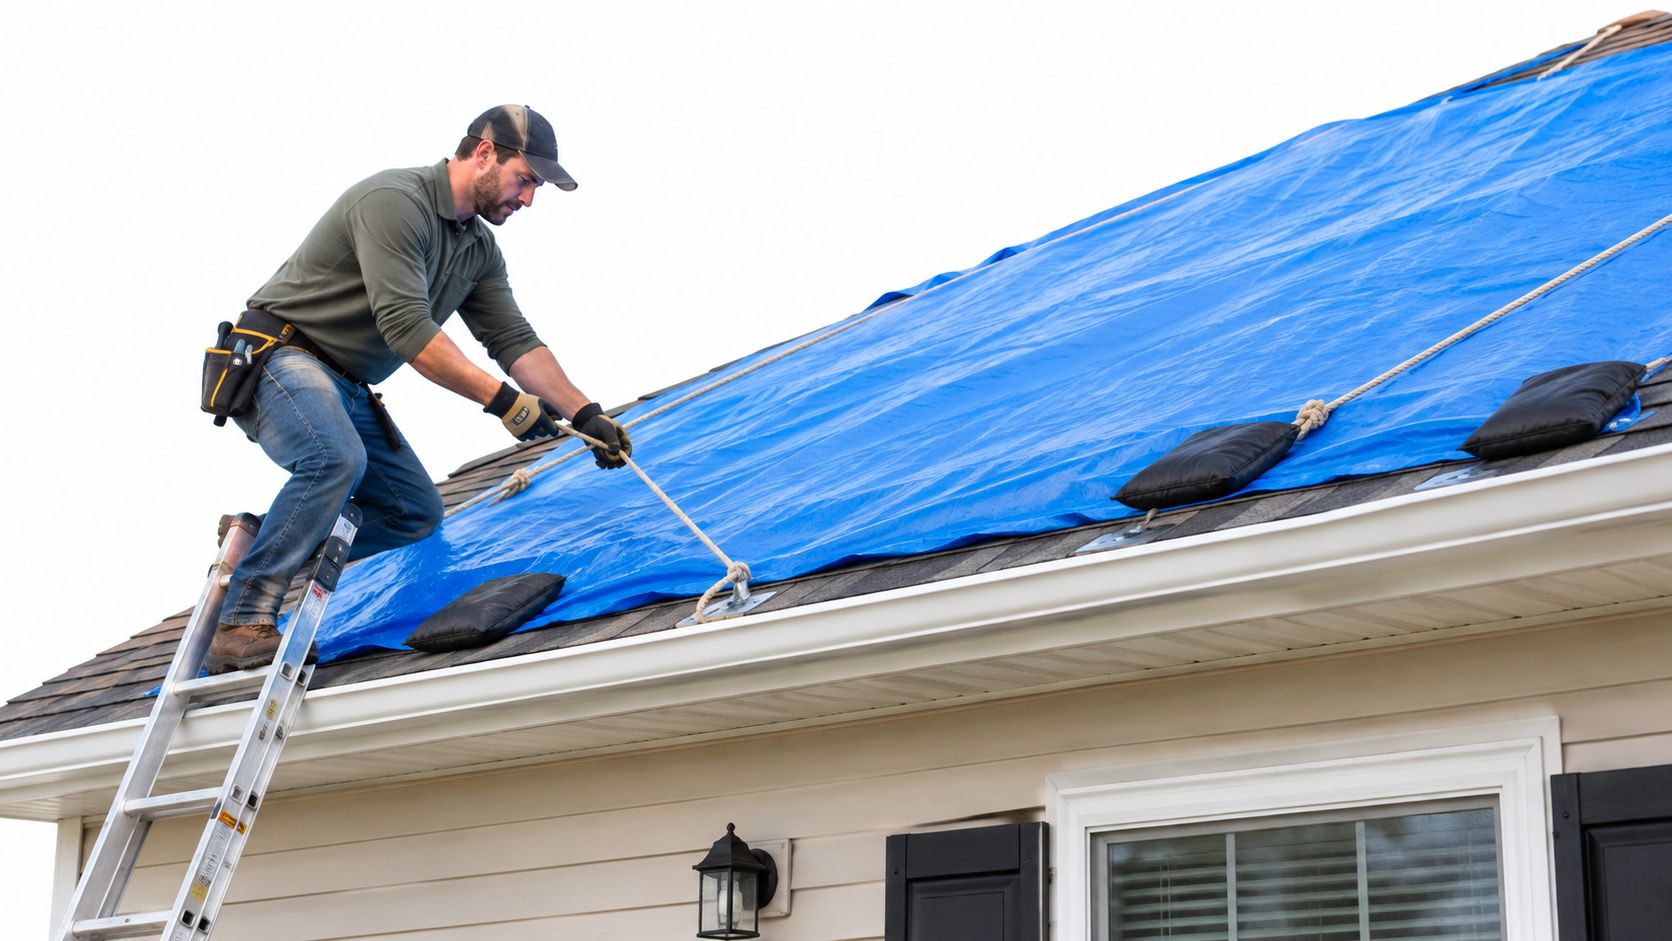
- Roof tarping. Have a properly equipped roofer handle installation, especially near valleys, steep slopes, damaged decking, or overhead electrical lines. Don't climb onto the roof during rain or wind.
- Localized temporary patches. Roofing cement or peel-and-stick material may suit a specific exterior detail when the product and substrate are compatible. Smearing material onto the attic side isn't a dependable substitute for restoring exterior drainage.
- Interior protection. Continue containment only while the space remains safe. Stop using the room if the ceiling changes shape or materials begin falling.
Before temporary work begins, photograph the condition and ask the contractor to record the product, location, and attachment method. If warranty coverage may apply, contact the installer or manufacturer for applicable requirements. Don't assume an emergency patch either preserves or voids coverage automatically.
Comparing the Three Main Leak Sources on DFW Homes
For a homeowner, shingles, flashing, and valleys are useful categories for discussing a repair. They aren't a verified ranking of DFW leak frequency, and similar interior symptoms can come from different exterior defects.
A missing shingle is easy to recognize from the ground. A failed flashing overlap can be much harder to see. That difference in visibility doesn't tell you which repair will be simpler.
Common DFW roof leak sources at a glance
| Leak Source | What You Usually See | Typical Repair Scope |
|---|---|---|
| Shingles | Missing tabs, creasing, exposed areas, or localized visible damage | Remove affected shingles, inspect underlying materials, and install compatible replacements |
| Flashing | Trouble around a chimney, roof-to-wall junction, skylight, or pipe penetration | Open the surrounding assembly as needed and rebuild the water-shedding detail |
| Valley | Suspected entry near an intersecting roof drainage channel | Inspect the channel and adjacent materials, then reconstruct the affected valley assembly |
Treat these observations as inspection clues, not permission to order materials from a photograph.
Wind-related shingle damage calls for a different investigation than deteriorated metal around a chimney. After hail, the roofer also needs to distinguish actual damage from weathering or unrelated surface marks. Don't let an easily photographed mark distract from the component that's admitting water.
Compare scope before comparing price
A targeted shingle repair may involve limited disturbance when surrounding materials remain serviceable. Flashing work can require removing otherwise intact shingles or opening adjoining materials to reach concealed connections. Valley work may require access along a drainage channel rather than a small isolated patch.
There isn't a defensible universal price band without inspecting the roof. Compare estimates by what the contractor proposes to remove, inspect, replace, and verify.
- Access and protection. Ask whether the estimate accounts for pitch, height, landscaping protection, and safe access.
- Concealed conditions. Find out how damaged decking or wet materials will be documented and priced if exposed.
- Repair boundaries. Ask why the proposed opening is large enough to rebuild the detail correctly.
- Finish and compatibility. Confirm the replacement materials and any limitations on matching existing shingles.
The cheapest estimate may omit the concealed work. Conversely, a larger scope needs an explanation supported by inspection findings, not a blanket assertion that every leak requires replacement.
Permanent Repairs That Actually Stop the Water
A permanent repair must restore the roof's water-shedding assembly, not just cover an opening with adhesive. Before approving work, ask the contractor to identify the verified defect, describe what must be opened, and explain how the rebuilt materials connect to sound roofing.
The crew should also assess affected underlying materials. Installing new shingles over an unsuitable substrate doesn't resolve the condition beneath them.
Match the repair to the failed component
For damaged shingles, the crew removes the affected material carefully, inspects underneath, and installs compatible replacements using the applicable manufacturer's fastening and sealing requirements. Matching color is useful, but matching the installation requirements matters more.
Flashing repair requires a different approach. At a chimney or wall, the contractor may need to rebuild the connection between roofing, flashing, and counterflashing rather than apply another exposed bead of sealant.

- Pipe penetrations. Evaluate the boot, its connection to the roofing, and the surrounding material. Don't treat every problem as a surface crack.
- Wall and chimney connections. Restore the required overlaps and fastening details, including concealed components where necessary.
- Valleys. Rebuild using a detail approved for the installed roofing system. Open-metal, woven, and other valley configurations aren't interchangeable across every product.
- Sealants. Use compatible materials where the assembly calls for them. Sealant supplements a correct detail; it shouldn't replace one.
Acceptance standard: The contractor should be able to explain how the repaired assembly directs water back onto the roof and toward drainage.
Verify the work and preserve the record
Where a controlled water test is appropriate, the contractor should repeat it after completing the repair and monitor the interior. Testing conditions and access limitations should be recorded rather than promising certainty that the inspection couldn't establish.
Request photographs of concealed work before it's covered, completed exterior details, and any damaged materials removed. Keep the written scope, material information, invoice, and warranty terms together.
For an insurance-related repair, separate the documented cause from resulting interior damage. That record helps describe what was found and repaired, but it doesn't guarantee coverage or a particular claim payment. Interior restoration should follow an assessment of drying and material condition, not merely the disappearance of dripping.
After the Storm - A North Texas Post-Storm Checklist
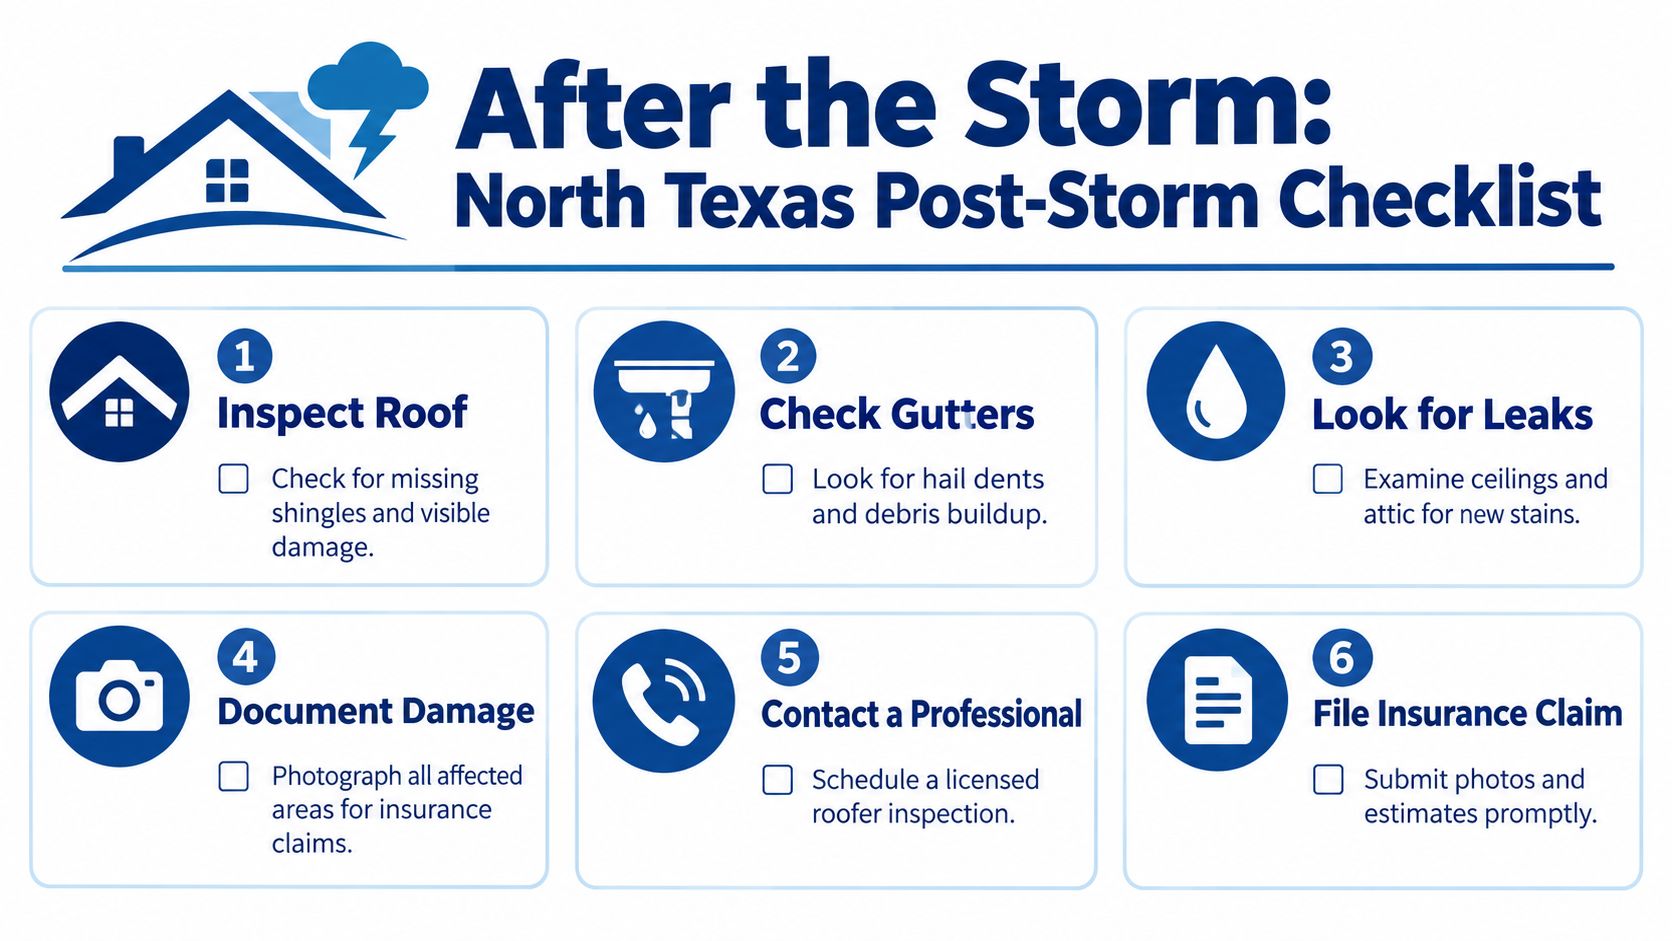
After hail or high winds, homeowners in Fort Worth, Arlington, Benbrook, Keller, and Southlake need an orderly inspection process, not an immediate trip up a ladder. These are concrete Tarrant County locations, alongside communities such as Forest Hill, Burleson, Crowley, and North Richland Hills, listed in the county's official incorporated-area directory.
Wait until the weather and outdoor conditions are safe. Then work from accessible areas and preserve observations before cleanup changes the scene.
A practical order of operations
- Inspect from the ground. Look for displaced roofing, fallen debris, and visible changes. Use binoculars or a phone camera rather than climbing for a closer view.
- Observe gutters and drainage. Photograph visible dents, displaced sections, and debris from a safe position. Don't treat gutter marks alone as proof of roof damage.
- Check inside. Look for fresh staining and dampness in accessible rooms and attic areas, staying within the safety boundaries already described.
- Document conditions. Save photographs, video, dates, and notes about when symptoms appeared. Keep records of emergency work and affected belongings.
- Arrange professional assessment. Request a written scope distinguishing observed hail or wind damage from wear, installation defects, and maintenance concerns.
- Contact your insurer when appropriate. Review reporting requirements promptly. Don't delay required notice while waiting for a contractor, and let the insurer determine coverage.
Track disruption as well as repair expenses
For businesses and multifamily properties, record affected rooms, equipment protection, cleanup, and interrupted use. A Journal of Architectural Engineering study of approximately 1,800 reported roof leaks over nine years at Carnegie Mellon UniversityAE.1943-5568.0000080) found that typical annual occupant costs exceeded roof maintenance and repair costs, though they remained below average annual replacement costs.
That institutional result isn't a price forecast for a Fort Worth home. It does support keeping a broader record than the roofer's invoice. A facilities manager should log response, recurrence, and disruption so repeated minor repairs don't conceal an unresolved operational problem.
When to Call a Fort Worth Roofer Instead of Fixing It Yourself
Call a roofer when you can't safely establish the scope, not just when you've run out of patching material. A recurring drip, expanding stain, or suspected damaged deck needs investigation beyond what a homeowner can reasonably confirm from the floor.
An older roof also deserves a condition assessment before paying repeatedly for isolated repairs. Age alone doesn't establish the need for replacement, but the contractor should explain whether surrounding materials can support a durable repair.
Clear reasons to escalate
- Structural warning signs. Sagging, falling ceiling material, or suspected compromised decking calls for keeping people away and obtaining professional assessment. Don't walk the roof to test for softness.
- Persistent or unexplained moisture. Staining that grows between storms warrants checking other possible water sources.
- Multiple affected areas. Ask whether the findings indicate separate defects or a broader assembly problem.
- Insurance involvement. Obtain photographs and an itemized scope that distinguish the cause, repair work, and resulting damage.
Choose documented work over broad promises
Ask prospective contractors who performs the work, how concealed damage is handled, and what inspection-to-repair records you'll receive. Local, in-house crews and claim-support services are useful considerations, but the deciding evidence should be the proposed repair and its documentation.
Fort Worth is the starting point, not a substitute for confirming your address is served. Homeowners in Forest Hill, Arlington, Benbrook, Burleson, Crowley, Keller, and Southlake should verify availability, as should those farther into Dallas, Denton, and Collin counties. The broader geography is consistent with the North Central Texas Council of Governments' region centered on Dallas and Fort Worth.
A professional repair isn't automatically cheaper. Its value is finding and correcting the failure so you aren't repeatedly paying to manage the same leak.
For roof leak diagnosis, shingle and flashing repairs, or documented storm-damage assessment, one local option is Blue Lake Roofing & Remodeling, which uses its own local crews and provides insurance-claims assistance. Visit the website to arrange a free on-site inspection in Tarrant, Dallas, Denton, or Collin County, and have your leak photographs and storm notes ready to discuss.
