
Hail Damage Roof Inspection in Fort Worth and DFW
The storm passed, there's no drip in the hallway, and from the driveway your roof looks exactly like it did yesterday. That doesn't settle anything. Hail can bruise shingle mats, split pipe boots, and dent flashing without opening an immediate leak. A proper Hail Damage Roof Inspection treats the storm report as context, then proves or rules out damage component by component, with photos you can hand to an adjuster.
Table of Contents
- Hail Damage Roof Inspection Checklist by Component
- Hail Size and Damage Classification
- How to Walk the Roof Step by Step
- Fort Worth and Surrounding DFW Cities to Cover
- Schedule the Inspection Before Any Repairs Begin
Hail Damage Roof Inspection Checklist by Component
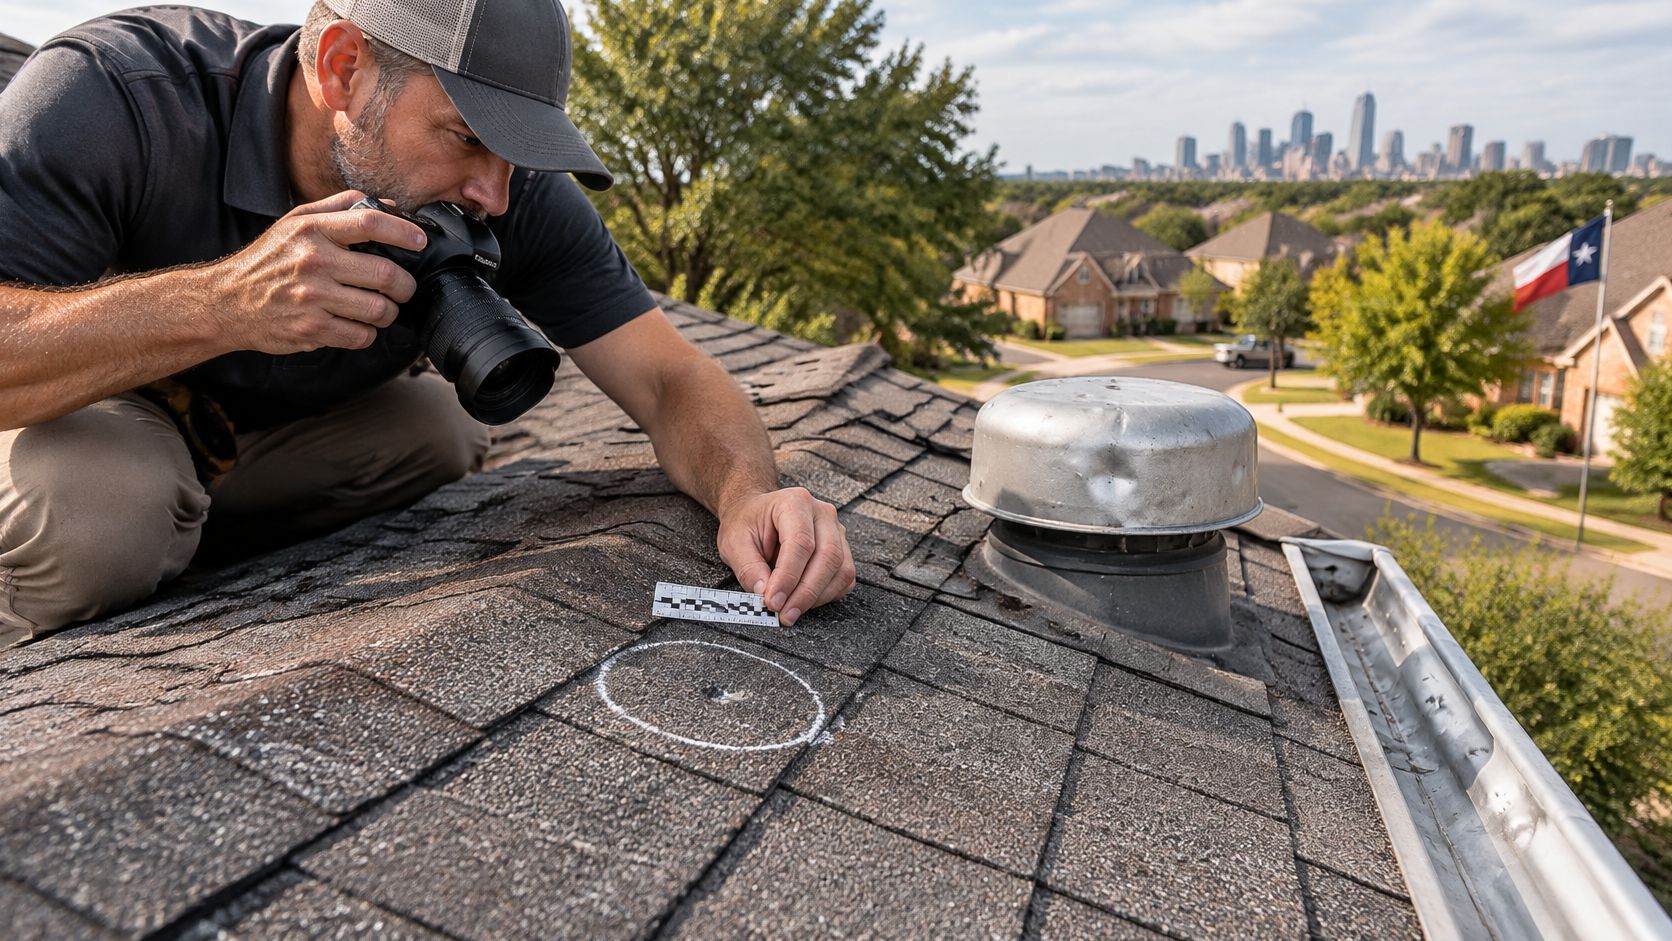
You're in Fort Worth after a spring storm, there's no leak, but your vent caps look dimpled and your gutters have fresh dents. Don't stop at that observation, and don't assume it's proof by itself. Log it, then work every component in a fixed order so nothing is judged from one angle.
The stakes justify the effort. The Insurance Information Institute data summarized in a state by state hail claims analysis indicate that wind and hail accounted for 40.7% of homeowners insurance claims in 2022, and the same source records 637,977 hail claims in Texas from 2017 to 2019. That's why a time stamped record matters even when the roof looks serviceable from the ground.
Work the Checklist Component by Component
| Component | What to check | Impact signs to record | How to document |
|---|---|---|---|
| Asphalt shingles | Every slope in a grid, bruised mats, cracked or lost granules | Soft spots, dark circular bruises, exposed mat, split tabs | Close up photo with scale marker, chalk circled hits, count per test square |
| Metal flashing and drip edge | Edges, seams, step and wall flashing | Dents, creased edges, cracked sealant | Oblique light photo, mark each dent with its roof plane |
| Vent caps and pipe boots | Metal vent covers, rubber boot condition | Dents in metal, split or torn rubber boots | Photo with scale, note vent type and location |
| Gutters and downspouts | Gutter faces, seams, downspout elbows | Dimpled or pitted metal, separated seams, granules in runs | Photo from the ground and up close, note elevation |
| Skylights | Frames, glazing, flashing | Cracked glazing, bent frames, displaced flashing | Photo of frame and glazing, record whether glazing is intact |
| Ridge caps and valleys | Ridge line, valley metal, cap shingles | Creased or split caps, displaced granules in valleys | Photo along the line, note cap type |
| HVAC condenser fins | Fin face, cabinet, lid | Flattened fins, dents in cabinet or lid | Photo with scale, note unit age and model if visible |
| Siding, fascia and soffit | Panels, trim, soffit vents | Dents, cracks, punctures in trim | Photo with scale, map by elevation |
Soft metals usually show you the storm first. Thin aluminum gutters, vent caps, and condenser fins dent under impacts that may only bruise a shingle mat underneath its granules. Log those dents first because they establish direction and intensity, then use them to decide where to press and photograph shingles more closely. They're indicators, not a diagnosis on their own.
For a second reference on structuring that evidence, the Audit Genius guide to hail inspections is useful alongside the table above. It reinforces the habit that keeps reports credible, which is tying every mark to a specific component and location.
Practical rule: If you can't name the slope, elevation, and material in a photo caption, that photo won't help you later.
Follow four rules on every Hail Damage Roof Inspection. Inspect every roof slope, not just the one facing the street, because wind driven hail rarely hits evenly. Photograph each component with a scale marker such as a tape measure or coin. Log roof age, material, and elevation at the start, and write down anything you couldn't reach safely. An honest gap in coverage is stronger than a silent one.
Hail Size and Damage Classification
Size comparisons give everyone a common language. A penny is 0.75 inch, a quarter is 1.00 inch, a half dollar is 1.25 inches, a golf ball is 1.75 inches, a tennis ball is 2.5 inches, and a baseball is 2.75 inches. Use those references in your notes instead of vague terms like large or severe.

| Hail diameter | Common comparison | Roofing effects to check |
|---|---|---|
| 0.75 inch | Penny | Usually cosmetic on most roofs, check soft metals for a pattern |
| 1.00 inch | Quarter | Can bruise thinner asphalt shingles, check granule loss and mat feel |
| 1.25 inches | Half dollar | Check asphalt bruising, split pipe boots, and dented flashing |
| 1.75 inches | Golf ball | Functional damage likely on asphalt, dents likely on metal and HVAC fins |
| 2.5 inches | Tennis ball | Check for punctures, cracked tile, and damaged skylight glazing |
| 2.75 inches | Baseball | Can puncture coverings and break tile or slate, check decking exposure |
That table is a starting point, not a verdict. The Nebraska Department of Insurance note quoted in NRCA guidance on roof repair after a hailstorm makes the point that the hail size capable of damaging heavy composite shingles may differ from the size that damages wood shakes. Assess asphalt, standing seam metal, clay tile, slate, wood shake, and commercial membranes separately, because each fails differently.
Separate the Three Damage Modes
- Deformation: Dents, ridges, and bent metal. It's real impact evidence, but a dented vent cap doesn't automatically mean a breached shingle.
- Granule loss: Displaced protective granules on asphalt. Alone, it's often cosmetic or age related, and I wouldn't call functional damage from granules by themselves.
- Breaches: Tears, cracks, punctures, and split shingles. These are functional damage because they've opened a water entry path or fractured the mat.
Rule Out Look Alikes Before You Label
Check look alikes first. Manufacturing defects, foot traffic scuffs, blistering, thermal cracking, wind creases, and old oxidized marks all get misread as hail. A fresh bruise tends to show clean, bright or dark mat fracture, while an old mark shows dirt, oxidation, or rounded weathering. Interior staining proves water got in, but it cannot date the storm that let it in.
Classify every finding as hail, wind, wear, or inconclusive, and name the one piece of evidence behind the label. A chalked circular bruise with fractured mat and matching soft metal dents on the same elevation supports hail. A straight crease on a lifted tab supports wind. Uniform granule shedding across an old slope supports wear. If the evidence doesn't resolve it, write inconclusive and state what you checked. That word isn't a failure, it's an accurate record.
A nearby hail report does not prove roof damage, and an apparently intact roof does not disprove it.
That's the discipline for North Texas homes, where an insurer, a contractor, and a weather database can give you three different answers. Weather data establishes that hail occurred nearby. Only physical evidence, weighted by material, establishes what it did to your specific roof.
How to Walk the Roof Step by Step
A repeatable walk beats scattered impressions every time. IBHS in its Roof 101 guidance identifies deformation, granule loss, and breaches as distinct physical outcomes, and notes that some impacts are cosmetic while others puncture the covering. Your steps should force that distinction on every slope.
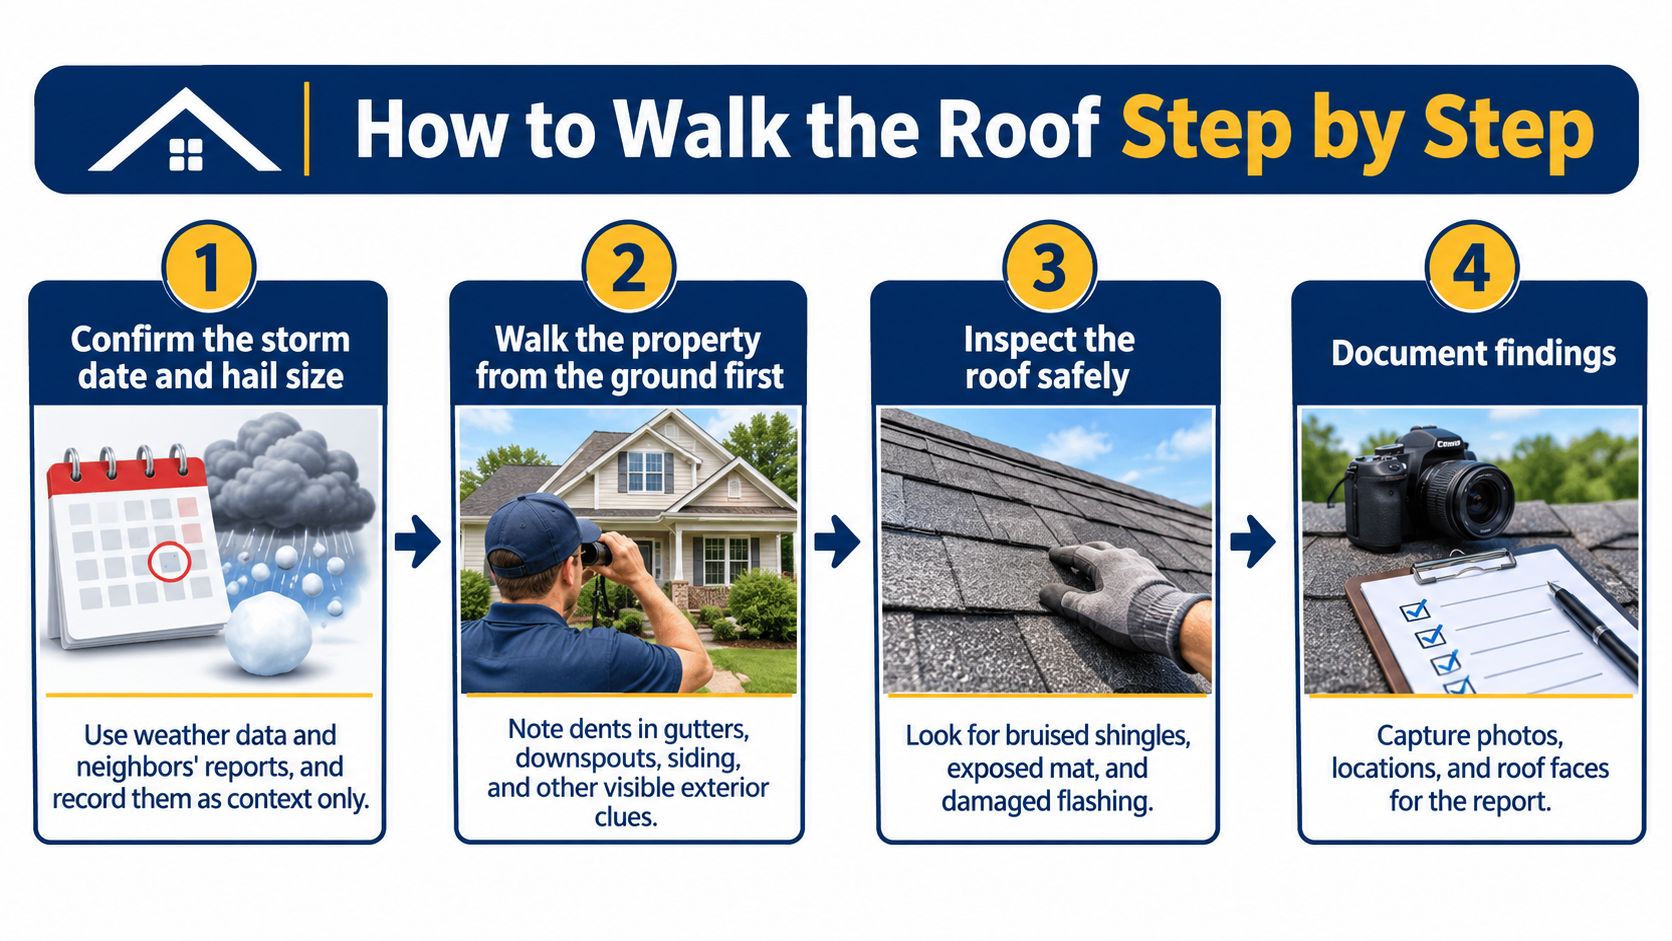
- Confirm storm context: Record the storm date and reported hail size from weather data and neighbors, and label both as context only. Context tells you where to look harder, it doesn't classify a single mark.
- Walk the ground first: Photograph elevations, gutters, downspouts, vents, siding, and AC fins before climbing. Ground level collateral shows impact direction and saves you hunting blind on the roof.
- Get safe access: Use a stable ladder tied off at the eave and fall protection where the pitch, height, or surface demands it. Skip steep, wet, or brittle roofs and note them as not inspected. No test square is worth a fall.
- Grid each roof plane: Divide every plane into a consistent grid and pick representative test squares, commonly 10 by 10 feet per slope. Representative means typical exposure, not the worst corner you can find.
- Count and chalk before photographing: Count impacts in each square, circle them with sidewalk chalk, then photograph wide to show the square and close with a tape measure for scale. Chalk first keeps your count honest and repeatable for an adjuster.
- Classify each impact by mode: Press bruises with your thumb to feel for mat fracture or a soft, spongy break, then sort marks into deformation, granule loss, or breach. Cosmetic marks and breaches need different treatment, so don't merge them into one hit count.
- Work penetrations and transitions: Check flashing, valleys, ridge caps, pipe boots, and skylight curbs closely with an oblique flashlight angle. Hail that glances off a field shingle can crease an edge, crack sealant, or split a boot where materials change.
- Confirm suspected breaches from inside: Where attic access allows, look for daylight, damp decking, or staining aligned with the roof location above. Record every area you couldn't inspect, including locked attics and slopes you stayed off for safety.
Do Not Let a Rating Replace the Walk
Treat a UL 2218 Class 4 label as a rating, not proof that no storm damage exists. That test uses steel balls and doesn't reproduce every natural hail impact mechanism, including irregular, wind driven stones hitting an aged, hot shingle. An impact resistant shingle can still bruise, and a standard shingle can survive a given storm. The label belongs in your report under materials. The classification belongs to the marks you found.
The common pitfalls are predictable. Inspectors declare damage from granule loss alone, confuse blistering and thermal aging with impacts, and inspect only the most visible slope. Map each finding to a roof plane, component, photograph, and recommended action, and keep pre existing condition photos in the same log. That mapping is what lets another professional verify your scope instead of trusting your summary.
Fort Worth and Surrounding DFW Cities to Cover
Start with Fort Worth, then expand outward by county instead of treating Dallas Fort Worth as one undifferentiated market. The U.S. Census Bureau QuickFacts in its Fort Worth and Dallas table recorded Fort Worth's April 1, 2020 population at 918,915. Fort Worth covers approximately 361 square miles in that same Census release, so one generic regional paragraph doesn't reflect how homeowners search or how storms track across the city.
| County | 2020 population | Reference cities |
|---|---|---|
| Tarrant County | 2,110,640 | Fort Worth, Arlington, Grapevine |
| Dallas County | 2,613,539 | Dallas, Irving, Richardson |
| Collin County | 1,064,465 | Plano, McKinney |
| Denton County | 906,422 | Denton, Lewisville |
Those county figures come from Census QuickFacts for the four county area, which lists 2,110,640 for Tarrant County, 2,613,539 for Dallas County, 1,064,465 for Collin County, and 906,422 for Denton County in 2020. Use the table as your lookup. A report for a home in Arlington or Grapevine shouldn't read like one written for Plano, McKinney, Denton, or Lewisville, even though the inspection method is identical.
Name Cities Without Repeating Generic Copy
Write each city's exposure separately. Name the neighborhoods, major streets, and roof types homeowners there recognize, whether that's older three-tab shingles in an established Fort Worth neighborhood, architectural shingles in Arlington subdivisions, or tile and standing seam in parts of Plano and Grapevine. The National Weather Service Fort Worth office maintains a North Texas climatology resource with monthly and annual normals and archived precipitation totals, including a specific DFW location option. Point readers there for storm context instead of copying a weather summary into every city page.
The practical rule is simple. Every report lists the storm date and the exact property address, because storm context for a Fort Worth home on a given evening can differ from a Plano or Irving home the same night. Hail swaths are narrow. A city name gets you found, but address level documentation is what makes a Hail Damage Roof Inspection in Richardson, Dallas, or Fort Worth defensible when an adjuster compares it against radar and a different neighborhood's claims.
Schedule the Inspection Before Any Repairs Begin
After a storm, a tarp or replacement shingle can cover the very marks an inspector needs to document. Photograph the roof before repairs begin, unless an active leak requires immediate protection and drying.
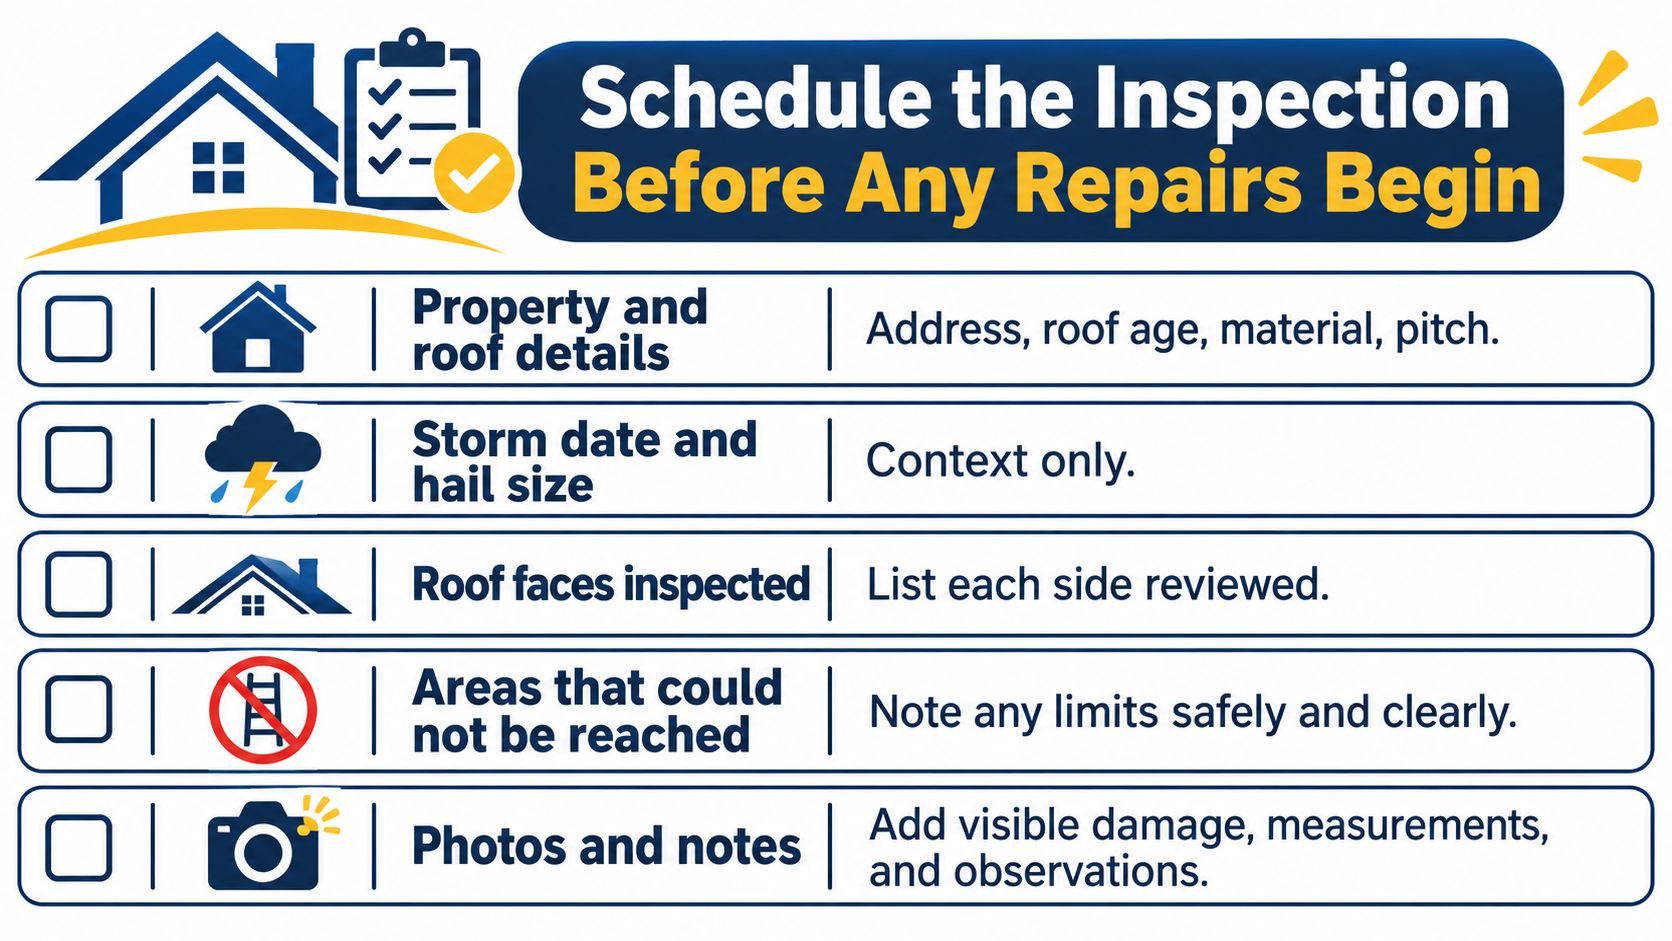
Use This Report Order Every Time
- Property and roof details: Record the address, roof age, material, pitch, known layers, and access notes.
- Storm date and hail size: Include these as context, with the source used.
- Roof faces inspected: List each plane and elevation, along with any areas that could not be reached and why.
- Numbered photo log: Match sequential photos to the roof plane and component; include a scale marker where useful.
- Measurements: Record test-square dimensions, hit counts, and the size of each impact cluster.
- Findings: Keep observed facts, probable cause, testing limits, and proposed scope separate. Label each finding hail, wind, wear, or inconclusive.
A useful finding separates observation from interpretation: “Circular bruise, fractured mat, north slope test square” describes what was observed. “Consistent with hail” gives the interpretation. Link both to a photo number so another reviewer can assess the evidence.
For low-slope commercial membranes, inspect seams, fasteners, flashings, edge metal, drains, and penetrations before the open field. A dent by itself does not establish membrane failure, and a puncture near a seam may be missed if the inspection focuses only on the field. Before recommending replacement, document repairability, warranty requirements, and any code-related assembly changes.
Base the recommendation on the findings, not the storm date. Monitoring may suit cosmetic deformation without a breach; repair may suit isolated breaches on a roof with service life remaining. Consider replacement when functional damage is distributed across slopes and spot repairs will not restore the system. If you are comparing contractors, a homeowner's checklist for vetting roofers can help you assess licensing, documentation practices, and references.
Blue Lake Roofing & Remodeling provides hail and storm damage inspections, documentation, restoration, and insurance-claims assistance across Tarrant, Collin, Denton, and Dallas counties. Schedule an inspection before repairs alter the evidence, and ask for a report that distinguishes hail, wind, wear, and inconclusive findings, including any areas that could not be inspected.
If hail has affected your DFW-area home, request a documented inspection before repairs begin. Photo records and clearly separated findings give you a more useful basis for discussing repair or replacement and coordinating with an adjuster.
