
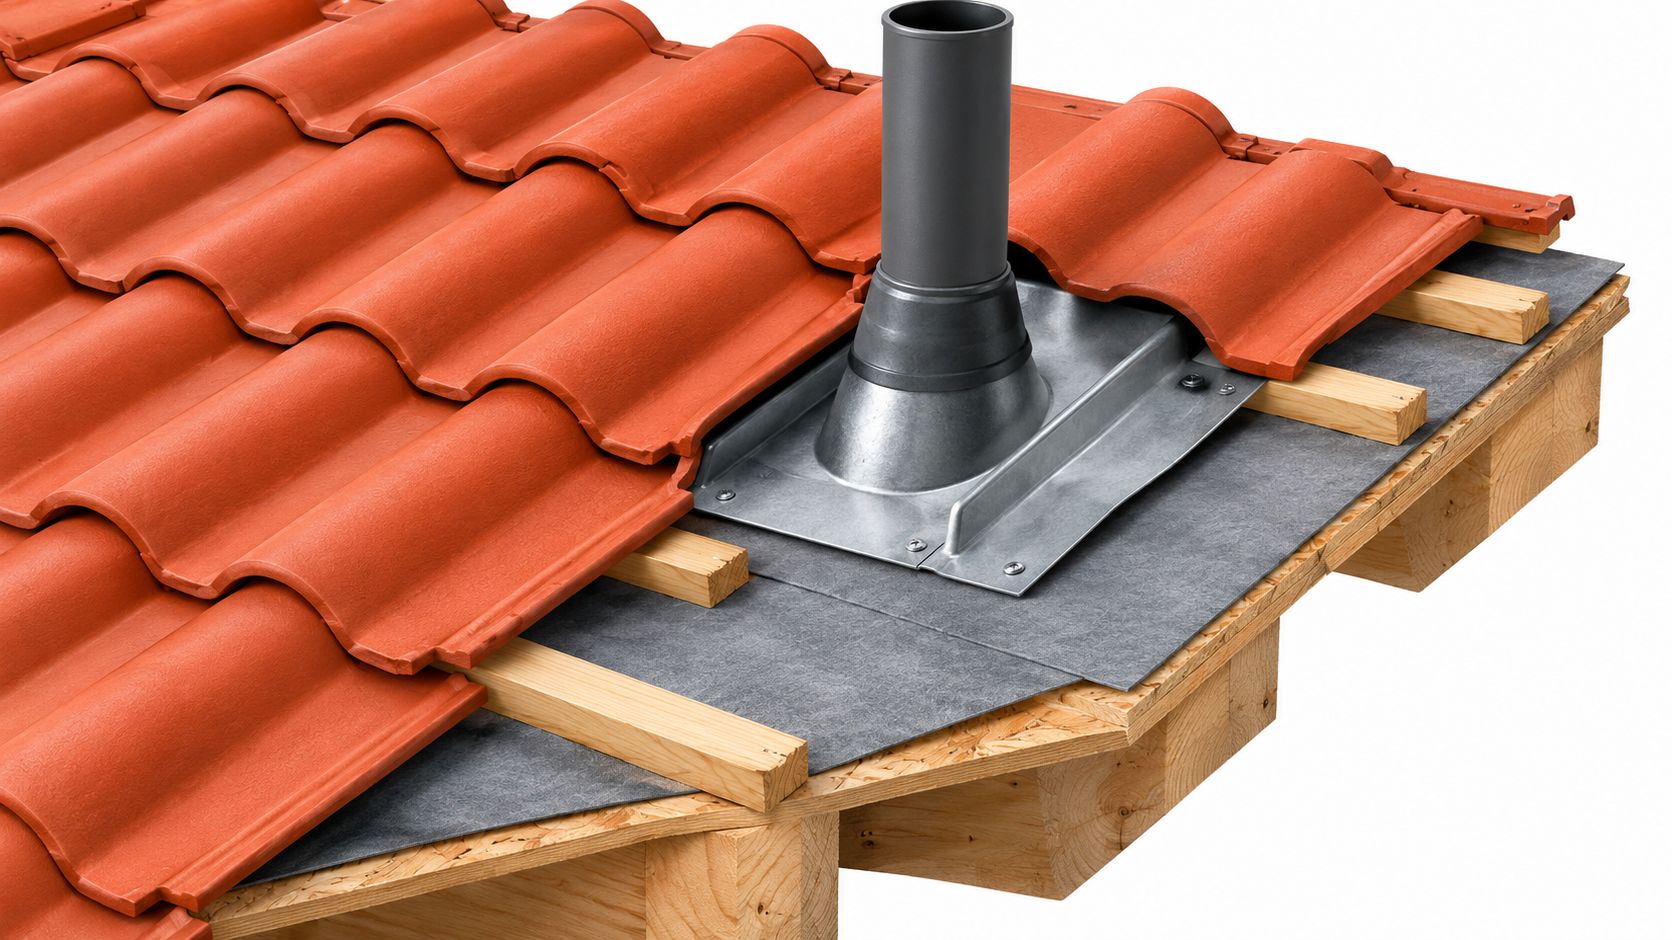
Clay Tile Roofing Details Explained for Lasting Roofs
A lot of homeowners in Fort Worth call about a clay tile roof for the same reason. They walk outside, look up, and the roof still looks beautiful. Then they walk back inside and see a brown ceiling stain, damp drywall, or paint starting to bubble near a fireplace wall.
That disconnect throws people off. If the tiles look fine, how can the roof be leaking?
The answer is that clay tile roofing details matter far more than many realize. The visible tile is only one part of the assembly. A clay tile roof is a layered system, and the parts that usually fail first are the hidden ones underneath. In real life, the waterproofing often depends on underlayment, flashings, valleys, and transitions long before the tile itself gives up.
That's why clay tile has such a strong reputation for longevity. Multiple lifespan references place clay or clay and concrete tile roofs in the 50 to 100 year range, with some sources stating 100-plus years, while also noting that the tile covering often outlasts the underlayment and flashing, which may need replacement after roughly 20 to 30 years according to roof lifespan data by material. That's a big distinction. The roof can be old in one layer and still young in another.
In North Texas, that layered thinking matters. Fort Worth heat cooks exposed components. Wind in Arlington and Bedford can test edge fastening. Debris in valleys around Cleburne, Lancaster, and Saginaw can trap water right where the roof is most vulnerable. A clay tile roof can still be a long-life roof, but only if the details below and between the tiles are built and maintained correctly.
Table of Contents
- Introduction Why Clay Tile Roofs Are More Than What You See
- How a Clay Tile Roof System Really Works
- Underlayment and Battens That Keep Water Out
- Flashing Valleys and Penetrations Where Leaks Begin
- Weight Structure and Slope Requirements for Clay Tile
- Common Failure Modes and How to Diagnose Them in DFW
- Planning Maintenance and Next Steps With a DFW Specialist
Introduction Why Clay Tile Roofs Are More Than What You See
A Fort Worth homeowner can walk outside after a storm, see a clay tile roof that still looks handsome and solid, then find a brown ceiling spot inside the same evening. That mismatch is what makes tile roofs tricky. The leak you see indoors often started somewhere else on the roof and traveled through the hidden parts before it showed itself.

The roof you see and the roof that actually seals
Clay tile lasts a long time, which is one reason homeowners choose it. But long life at the surface does not mean every layer underneath is in the same condition. A tile roof is a system of parts with different jobs and different aging patterns.
The easiest way to picture it is a brick wall with a drainage layer behind the brick. The brick takes the weather, while the layers behind it manage the water that gets through. Clay tile works in a similar way. The tiles shed most of the sun, rain, and hail. The underlayment, flashing, and transitions do the quiet work that keeps the house dry.
That distinction matters in North Texas. In DFW, strong sun can wear out exposed components, fast storm runoff can stress valleys, and wind can loosen edges and metal details before the clay itself shows much age. A roof can look healthy from the yard and still have a failing waterproof layer below the tile.
Practical rule: If a clay tile roof leaks and the field tiles still look mostly intact, start by checking the hidden water-control layers, not just the visible tile.
Why DFW homes need a different diagnostic eye
A good tile roof inspection in Fort Worth, Arlington, Bedford, Cleburne, Lancaster, or Saginaw should answer one plain question first. Are you dealing with tile damage, or with an older roof system finally showing weakness underneath?
Those are not the same repair.
A cracked tile near a branch impact is often a local problem. Worn underlayment at a valley, loose flashing at a wall, or repeated water entry around a vent usually points to a system problem. One calls for a focused repair. The other may call for broader work in the areas you cannot see from the ground.
That is why driveway-level opinions miss so much on clay tile roofs. The visible covering tells only part of the story. The diagnosis comes from reading the details below and between the tiles, where North Texas heat, wind, and runoff do their slow work.
How a Clay Tile Roof System Really Works
If you want to understand clay tile roofing details, stop thinking of the roof as one hard shell. Think of it as a dressed-up raincoat. The outer layer takes the hit. The layer below keeps you dry.
That simple idea clears up most of the confusion around tile roofs.

Start at the wood deck
At the bottom is the roof deck. That's the solid base attached to the framing. It doesn't shed water by itself, but it supports every layer above it.
On top of the deck goes the underlayment. This is the part many homeowners never see, yet it does a huge amount of the waterproofing work. If the deck is the body of the roof, the underlayment is the raincoat.
Then come battens, in assemblies that use them. Battens create spacing and provide attachment points. They can also help form drainage paths beneath the tile.
Finally, you get to the clay tiles. Those are the visible pieces that give the roof its character. Their job is to shed the bulk of the weather, slow the movement of water, and protect the layers below from direct sun and impact.
Every layer has a different job
People often assume the tile alone seals the house. It doesn't. A clay tile roof is better understood as a water-shedding system with backup protection below.
Here's the plain-language version:
- Deck: Holds the system together.
- Underlayment: Stops water that gets past the tile.
- Battens: Create separation and support where the design calls for them.
- Tile: Takes sun, rain, and hail exposure while shedding most water.
- Flashing: Handles the awkward spots where straight roof planes meet walls, valleys, chimneys, and pipes.
If one of those layers is poorly detailed, the weak spot doesn't stay isolated for long.
The roof doesn't fail because clay is a bad material. It fails when one small transition lets water slip behind the system.
Why drainage details connect to the edges of the roof
A clay tile roof also depends on clean exit paths for water. Once runoff reaches the eaves, it needs to leave the roof cleanly instead of backing up under the edge details. Homeowners who want to understand that part of the assembly can learn a lot from this guide on gutter installation for roofers, especially how edge drainage affects the rest of the roof system.
That matters because water rarely causes trouble while it's moving downhill in the open. Trouble starts where runoff slows, turns, or meets another material.
Underlayment and Battens That Keep Water Out
If the tile is the roof's armor, the underlayment is the part that keeps the house dry when armor gets tested. That's the simplest way to understand this layer.
A lot of clay tile roof leaks begin after the tile shifts, cracks, or opens just enough for wind-driven rain to reach the membrane below. At that point, everything depends on whether that hidden layer was installed with the right laps, fastening, and terminations.
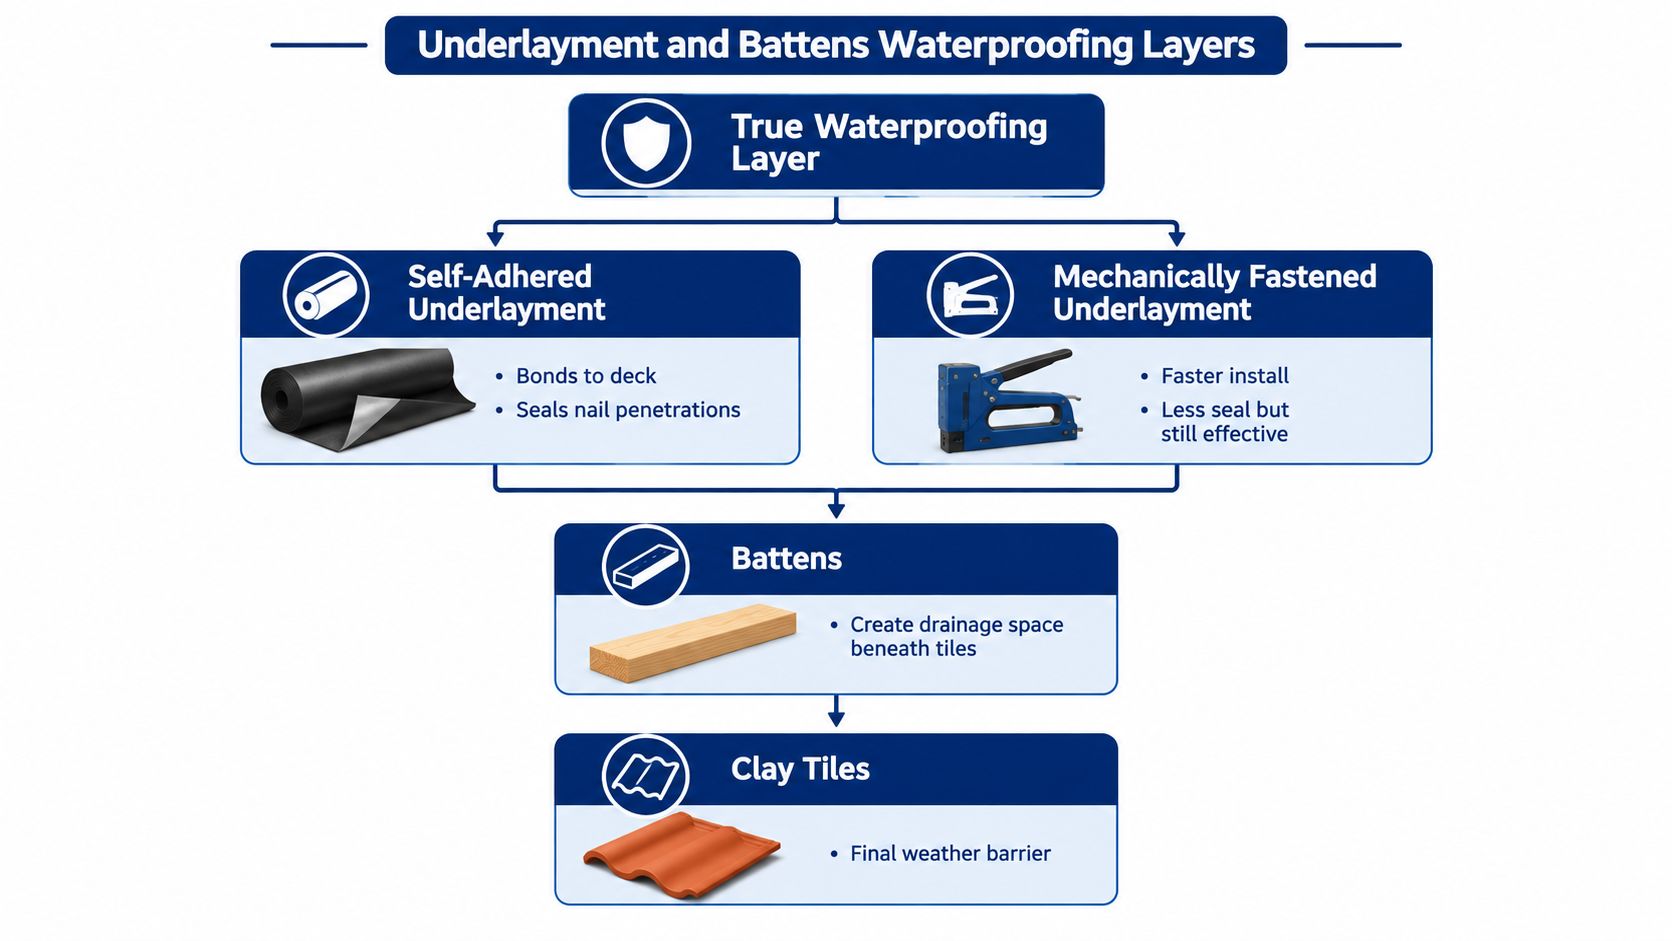
What the underlayment is really doing
A Florida high-wind tile manual gives a very useful picture of good practice. It specifies self-adhered underlayment products that meet TAS 103 wind-uplift testing, calls for sheets to run perpendicular to the slope, and requires back-nailing or approved fasteners at 12 inches on center near the top edge, along with minimum 4-inch head laps and 6-inch side laps. It also calls for sealed laps and underlayment turned up at least 4 inches on vertical transitions, as shown in the Florida tile installation guide.
Those aren't fussy little details. They're the difference between a membrane that stays in the fight and one that opens up under pressure.
British tile guidance included in that same verified summary adds the design logic. Underlay should reduce wind uplift load, act as a secondary barrier to rain, and avoid direct contact with tiles so the wind load doesn't transfer into the tile layer. That means underlayment isn't just backup waterproofing. It's part of the roof's wind behavior too.
Self-adhered versus mechanically fastened
Homeowners often hear these terms and get lost. Here's the practical difference.
- Self-adhered underlayment: This bonds to the deck. It can seal more tightly around penetrations and often gives stronger continuity in vulnerable areas.
- Mechanically fastened underlayment: This relies on approved fasteners to hold it in place. It can still perform well, but workmanship on laps, fastening, and transitions becomes even more important.
- Both systems: Need correct overlap, clean substrate prep, and proper tie-ins at walls, valleys, and penetrations.
The point isn't that one option is always right. The point is that no membrane works well if the crew rushes the seams.
Why battens matter more than they look
Battens seem simple. They're just strips, right? In a good tile assembly, they do more than that. They can create a drainage space, help support tile placement, and reduce direct bearing between tile and membrane depending on the system design.
That air gap and spacing can help water move where it should move. It also helps explain why a roof can look fine from the yard and still have a problem below the tile line.
Ask your roofer where the underlayment turns up, how the laps are sealed, and how the battens interact with drainage. If they only talk about the tile profile, you're not hearing the whole roof.
For DFW homes, that hidden membrane work matters because heat and storm gusts don't care how attractive the tile looks from the street.
Flashing Valleys and Penetrations Where Leaks Begin
Most roof leaks don't start in the middle of a clean open field of tile. They start where water changes direction or where one material runs into another.
That's why experienced roofers spend so much time on flashing details. Valleys, sidewalls, chimneys, skylights, vent pipes, ridges, and hips are the places where the roof has to do actual water management, not just water shedding.
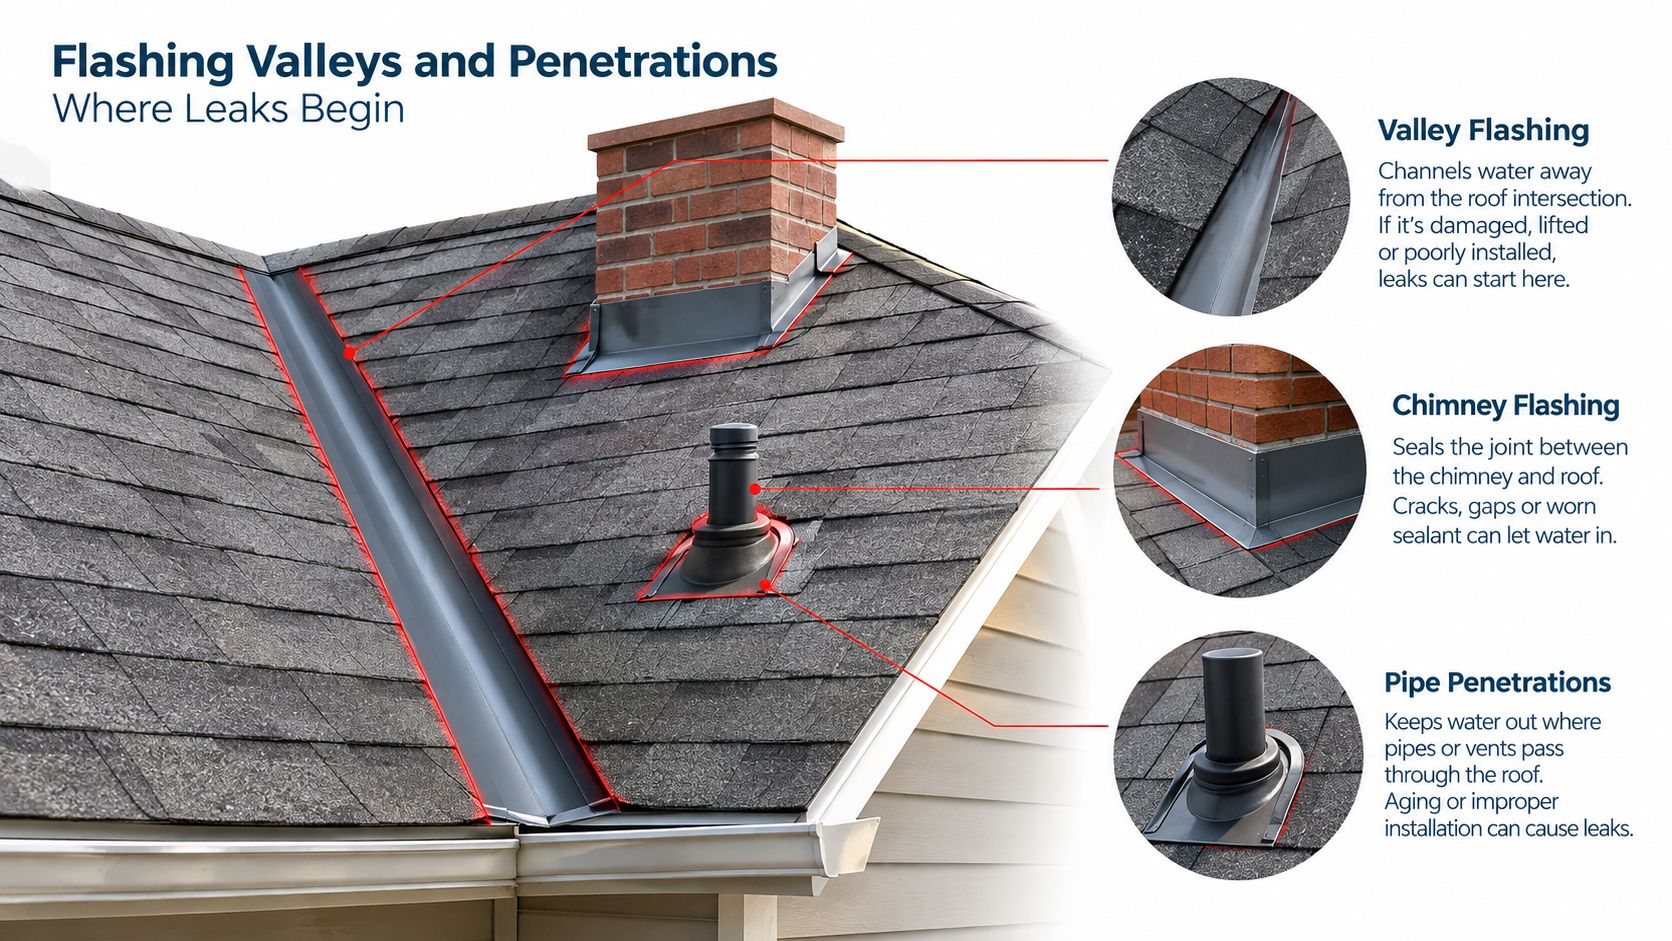
Valleys carry more water than most homeowners realize
A valley is where two roof slopes meet and funnel runoff into one concentrated path. Even a small mistake there can send a lot of water into the assembly.
If you've ever tried to read an insurance scope or contractor line item and weren't sure what was being referenced, this short glossary entry can help you find valley in estimate audits. That matters because valley work is often where leak repairs become partial tear-offs under tile.
In practical terms, a valley has to do three things well:
- Collect runoff: Without letting tile edges interfere with flow.
- Stay continuous: So water doesn't find a lap running the wrong way.
- Exit cleanly: Without debris build-up forcing water sideways.
A Fort Worth home with a leak near a dining room ceiling might have perfectly usable field tile but a valley metal detail that has worn, lifted, or trapped debris under the tile edges. An Arlington home with staining near an inside corner may have the same story with a different symptom.
Walls chimneys and vent pipes are sequencing tests
Sidewall flashing, counter flashing, and pipe flashings aren't decorative trim. They are transition pieces that have to lap in the correct order so gravity stays on your side.
Here's where people get fooled. The tiles around a chimney can look straight and intact, while the flashing behind them has opened at a corner or lost continuity where the roof meets the vertical surface. Water enters behind the tile, follows the path of least resistance, and shows up indoors far away from the visible gap.
Watch for these clues:
- Ceiling stain near a fireplace chase: Often points to wall or chimney flashing before it points to tile failure.
- Leak around a bathroom vent or flue: Often traces to flashing or boot issues before it traces to the tile itself.
- Interior leak after debris season: Often suggests blocked drainage at a valley or roof-to-wall transition.
Good flashing is like a series of overlapping shingles made of metal. Every piece should guide water onto the next piece and back out to daylight.
Ridge and hip details need the same level of care
Ridges and hips don't carry water like valleys do, but they see changing wind pressure and rely on continuity in the details below and around the cap tiles. If those transitions are rushed, wind-driven rain can work into the assembly in ways the homeowner never sees from the ground.
That's why leak diagnosis on clay tile roofs should start at the intersections, not the prettiest open section of roof.
Weight Structure and Slope Requirements for Clay Tile
A clay tile roof is a heavy, layered assembly. The part you see from the yard is only the top skin. The framing below has to carry that weight for decades, and the slope has to help the whole system shed water the way it was designed to.
That matters even more on a retrofit in DFW. A home that handled a lighter roof just fine may need a structural review before clay tile goes on. And if a leak shows up later, the diagnosis should not stop at a cracked tile. On many older tile roofs, the hidden layers and transitions reach the trouble point before the tile field does.
Real numbers that affect real houses
Manufacturer and evaluation documents show how substantial clay tile can be. One example tile weighs 7.5 pounds each and measures about 16.3 inches long by 11.8 inches wide, while another tile roof system is listed at 14.7 pounds per square foot installed weight and can be approved for slopes from 3:12 up to 21:12 depending on tile type, according to this Miami-Dade product approval document.
Those numbers help explain why a clay tile proposal should start with structure and pitch, not color and curb appeal.
Clay Tile Weight and Slope Quick Reference
| Detail | Example Value | What It Means for Your Roof |
|---|---|---|
| Individual tile weight | 7.5 pounds each | Handling, fastening, and support all matter during installation |
| Example tile size | 16.3 inches by 11.8 inches | Tile layout, overlap, and exposure affect how the roof sheds water |
| Installed system weight | 14.7 pounds per square foot | Framing and deck capacity need review before replacing a lighter roof with tile |
| Approved slope range | 3:12 to 21:12 depending on tile type | Not every tile fits every roof pitch, so selection has to match geometry |
Why slope changes the whole conversation
Slope controls more than appearance. It affects how quickly water leaves the roof, how much overlap protection the tile pattern provides, and how much wind pressure works at the edges and high points.
A low-slope tile roof has less help from gravity, so the underlayment below the tile becomes even more important. A steep roof sheds faster, but it also changes attachment demands, crew access, and the way wind loads act near eaves, hips, and ridges. Roof shape matters too. A simple broad plane behaves differently than a cut-up roof with lots of intersecting sections.
That is why DFW leak diagnosis needs a systems view. If the pitch is marginal for the tile profile, or the roof has difficult transitions, water problems often start below the visible tile long before the field of tile looks worn out.
For homeowners in Tarrant, Collin, Denton, and Dallas counties, a proper assessment should look at framing, deck condition, roof pitch, and exposed edge zones before a tile retrofit moves from idea to proposal.
One option homeowners sometimes consider for that kind of assessment is Blue Lake Roofing & Remodeling, which works on specialty roofing in the Dallas-Fort Worth Metroplex and can document structure, slope, and code-related installation considerations as part of an on-site review.
Common Failure Modes and How to Diagnose Them in DFW
A DFW homeowner often sees the same worrying scene. A ceiling stain shows up after a hard spring storm, the clay tile still looks fine from the yard, and the first assumption is that the roof "shouldn't be leaking" because the tile looks intact.
Clay tile roofs fool people that way. The tile is the outer shell you can see, but leaks often start in the layers below it. In North Texas, sun, heat swings, wind-driven rain, hail impact, and debris in valleys tend to wear out underlayment, flashing, and attachment points before the field tile reaches the end of its life.
That is why diagnosis matters more than guesswork. A cracked tile can cause a leak. So can a sound-looking tile roof with tired underlayment at a valley or wall line.
Symptom versus likely source
| What you notice | More likely cause | Usual repair direction |
|---|---|---|
| One obvious cracked or slipped tile, no widespread staining | Localized tile damage | Targeted tile replacement and inspection of the layer below |
| Stain near a roof intersection or inside corner | Valley or wall flashing issue | Open the area, inspect metal and membrane sequence |
| Repeated leak with intact-looking tile field | Aging underlayment or hidden transition failure | Diagnostic lift and likely broader repair area |
| Leak near vent, flue, or pipe | Penetration flashing problem | Rework flashing and inspect surrounding membrane |
| Wind damage concentrated at edges, hips, or ridges | Fastening pattern not adequate for exposure area | Re-secure affected zones and verify attachment pattern |
That distinction saves money. Replacing visible tile without checking the water-shedding layers below is like replacing a few bricks on a chimney when the flashing at the base is the problem.
A more useful overview of that gap appears in this discussion of clay tile roof installation and leak diagnosis, which points out how often homeowners need help telling tile failure from underlayment failure.
What wind damage tends to look like in North Texas
Wind rarely pulls on a tile roof evenly. Trouble usually starts at the perimeter and at transitions, especially eaves, hips, ridges, rake edges, and outside corners. Those areas catch stronger uplift, and once a few pieces shift, nearby tiles can lose the support and overlap that help keep water moving downslope.
From the ground, the clues are often subtle:
- At the eaves: Starter courses may shift, or water may sneak under the first rows during blowing rain.
- At hips and ridges: Cap tiles can loosen, crack at mortar or fastening points, or open a path for water at the highest transitions.
- At corners and rake edges: A small-looking disturbance can hide broken attachment points or exposed underlayment.
- In valleys: Leaves and granules can trap water, slow drainage, and push runoff sideways into weak flashing laps.
After hail, a homeowner may focus on chipped tile surfaces, but the more important question is whether impact or movement damaged the flashing, punctured the underlayment, or loosened tiles enough to change the way water tracks underneath.
When a local repair is enough and when it is not
A local repair usually makes sense when the problem is isolated. One broken tile after foot traffic, one slipped piece near an edge, or one well-defined flashing issue can often be repaired without opening a large section.
Broader work makes more sense when the pattern says the hidden system is aging out. Repeated leaks in the same area, staining that returns after tile replacement, multiple weak valleys, or failures at several penetrations usually point to underlayment or flashing problems that extend beyond one tile.
A good tile-roof diagnosis follows the water path, not just the broken piece. Water can enter high, travel along underlayment or decking, and show up far away inside the home. That is why the room stain and the roof defect do not always line up vertically.
A practical homeowner checklist before the inspection
Use simple notes and photos to help the roofer trace the assembly failure:
- Document the interior: Photograph stains, bubbling paint, damp trim, or active drips.
- Note the storm type: High wind, hail, long steady rain, or debris buildup each points to a different failure pattern.
- Look from the ground only: Check for slipped tile, crooked ridge lines, debris-packed valleys, or visible metal out of place.
- Describe the roof detail, not just the room: Say "near the front valley" or "at the chimney sidewall" instead of only "above the bedroom."
- Mention repair history: If the same area has been patched before, that often points to a hidden flashing or underlayment issue.
Those details help a DFW roofer test the right area first and separate true tile damage from the hidden failures that clay tile roofs commonly develop long before the roof looks old from the street.
Planning Maintenance and Next Steps With a DFW Specialist
A clay tile roof lasts longest when you treat it like an assembly, not a decoration. The smartest maintenance plans focus on the hidden details that age first.
For homeowners in Fort Worth, Bedford, Cleburne, Lancaster, Saginaw, and across the Dallas-Fort Worth Metroplex, that usually means checking the roof after high wind, hail, and heavy debris periods. You're not just looking for broken tile. You're looking for movement at edges, blocked valleys, loose ridge areas, and signs that flashing or underlayment may have been stressed.
A practical maintenance rhythm
Keep it simple and consistent:
- After major storms: Have the roof inspected for displaced tile, exposed underlayment, and flashing movement.
- During debris season: Clear valleys and drainage paths so water can exit the roof properly.
- Around penetrations: Watch ceilings and wall lines near vents, chimneys, and roof-to-wall areas for early staining.
- Before buying or remodeling: Ask for a roof review that considers structure, slope, fastening, and remaining life of hidden components.
What a useful inspection should give you
A real tile-roof inspection should leave you with clarity, not just a generic statement that the roof is “old” or “fine.” You should come away understanding whether the problem is isolated tile damage, flashing failure, membrane aging, or a combination.
A good inspection tells you where the water got in, why it got in, and whether a local repair will actually hold.
That level of detail matters whether you're maintaining a long-owned home in Fort Worth or evaluating a tile-roof property elsewhere in DFW. The metroplex footprint itself supports that local focus, with Fort Worth and nearby cities including Arlington, Bedford, Cleburne, Lancaster, and Saginaw shown on the Texas Department of Transportation Dallas-Fort Worth metroplex map.
A clay tile roof can serve a house for a very long time. The key is knowing that the prettiest part of the roof isn't always the part making the waterproofing decision.
If you're dealing with a leak, storm damage, or an aging tile system in North Texas, Blue Lake Roofing & Remodeling can inspect the roof as a full assembly and document whether the issue is tile, underlayment, flashing, or structure-related. For homeowners in Fort Worth and surrounding DFW cities, visit Blue Lake Roofing & Remodeling to schedule a free on-site inspection and get a clear plan for repair or replacement.
